HP LH4r HP Netserver LH 3/LH 3r Power Supply Upgrade Kit
HP LH4r - NetServer - 256 MB RAM Manual
 |
View all HP LH4r manuals
Add to My Manuals
Save this manual to your list of manuals |
HP LH4r manual content summary:
- HP LH4r | HP Netserver LH 3/LH 3r Power Supply Upgrade Kit - Page 1
HP NetServer LH 3/LH 3r Power Supply Upgrade Kit Installation Guide HP Part Number 5967-2108 Printed in June 1998 - HP LH4r | HP Netserver LH 3/LH 3r Power Supply Upgrade Kit - Page 2
-Packard shall not be liable for errors contained herein or for incidental or the use or reliability of its software on equipment that is not furnished guide is for the person who installs, administers, and troubleshoots LAN servers. Hewlett-Packard Company assumes you are qualified in the servicing - HP LH4r | HP Netserver LH 3/LH 3r Power Supply Upgrade Kit - Page 3
9 Power Supply Cage Installation 10 Power Supply Installation 12 3 Installing the Fan Module 15 Installing Fan Module 15 Replacing the Covers 17 HP NetServer LH 3 17 HP NetServer LH 3r 17 4 Warranty and Support 19 Hardware Warranty 19 HP Repair and Telephone Support 19 Index ...23 iii - HP LH4r | HP Netserver LH 3/LH 3r Power Supply Upgrade Kit - Page 4
- HP LH4r | HP Netserver LH 3/LH 3r Power Supply Upgrade Kit - Page 5
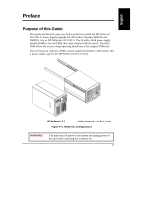
this Guide This guide describes the steps you need to perform to install the HP NetServer LH 3/LH 3r Power Supply Upgrade Kit, HP Product Numbers D6093A and D6095A, into an HP NetServer LH 3/LH 3r. The kit adds a third power supply module (PSM) to the two PSMs that come standard with the server. The - HP LH4r | HP Netserver LH 3/LH 3r Power Supply Upgrade Kit - Page 6
the HP NetServer LH 3 and LH 3r: • The HP NetServer LH 3/ LH 3 User Guide • The HP NetServer LH 3 Installation Road Map • The HP NetServer LH 3r Installation Road Map • The Product and Service Reference Labels • HP NetServer LH 3 and LH 3r Technical Reference Card • HP NetServer LH 3 and LH 3r - HP LH4r | HP Netserver LH 3/LH 3r Power Supply Upgrade Kit - Page 7
. • An anti-static service kit (3MTM 8501/8502/8503 or equivalent). This kit includes a static-dissipating work surface, a chassis clip lead, and a wrist strap. Installation Overview The Power Supply Upgrade Kit installation procedure is as follows: 1. Remove the HP NetServer front bezel and covers - HP LH4r | HP Netserver LH 3/LH 3r Power Supply Upgrade Kit - Page 8
to function properly. Removing the Covers CAUTION Never operate this NetServer without first installing all covers. Operating the system without all reduces critical cooling airflow over some components, such as hard disk drives and processor modules. Operating the system without all covers - HP LH4r | HP Netserver LH 3/LH 3r Power Supply Upgrade Kit - Page 9
Chapter 1 Introduction HP NetServer LH 3 To remove the covers: WARNING Turn off the HP NetServer and disconnect the power cord and telephone cord. 1. Unlock the bezel lock with the key from the key bag located on the rear of the HP NetServer (see Figure 1-1). 2. To remove the front bezel, pull - HP LH4r | HP Netserver LH 3/LH 3r Power Supply Upgrade Kit - Page 10
, using the handle on the covers, and then lift them off the chassis (see Figure 1-1). 2. 3. Tabs and Slots 4. Thumbscrews Cover 1 Cover 3 Figure 1-1. Removing the Covers (HP NetServer LH 3) 6 - HP LH4r | HP Netserver LH 3/LH 3r Power Supply Upgrade Kit - Page 11
of the rack. This anti-tip device must be extended to prevent the rack and LH 3r from tipping over, which could damage the LH 3r and injure people. To remove the covers: 1. Turn off the HP NetServer and disconnect all power and telephone cords. 2. Remove the screws securing the latch plate and - HP LH4r | HP Netserver LH 3/LH 3r Power Supply Upgrade Kit - Page 12
to rack Do not remove three Cover 3 screws securing the hinge to the LH 3r Do not remove two screws securing the bracket to the LH 3r Figure 1-3. Screw and Cover Locations (LH 3r) 3. Slide out the NetServer until the rail locks "click" into place. 4. Loosen the thumbscrew at the front of covers - HP LH4r | HP Netserver LH 3/LH 3r Power Supply Upgrade Kit - Page 13
shows how to mount an additional power supply cage in an HP NetServer LH 3 or LH 3r. It then describes how to install the power supply module (PSM) in the empty cage. NOTE Before beginning this procedure: • Shut down the HP NetServer operating system. • Turn off the power switch on the front panel - HP LH4r | HP Netserver LH 3/LH 3r Power Supply Upgrade Kit - Page 14
Chapter 2 Cage and Power Supply Installation Power Supply Cage Installation Before installing the power supply cage, remove covers 1 and 3 as described in Chapter 1. To install the cage, follow these steps: 1. Loosen the two Torx screws on the front panel to be removed cabinet (see Figure 2-1). 2. - HP LH4r | HP Netserver LH 3/LH 3r Power Supply Upgrade Kit - Page 15
power supply module from the cage, then set the new cage in the open bay. 5. Push in the cage most of the way. Align and guide the cage into the chassis slowly. 6. There are three connectors to attach to install the power supply cage: two large, white connectors that snap in - HP LH4r | HP Netserver LH 3/LH 3r Power Supply Upgrade Kit - Page 16
. Power Supply Installation To install a power supply module (PSM) in the empty power supply cage, follow these steps: CAUTION When lifting a PSM, be prepared to support its weight. Hold the PSM with two hands. 12 - HP LH4r | HP Netserver LH 3/LH 3r Power Supply Upgrade Kit - Page 17
filler panel from the Upgrade Kit. Fasten the panel in place with its thumbscrews. The PSM is now installed. However, do not turn on the server until you install the fan module from the Upgrade Kit. See Chapter 3. 13 - HP LH4r | HP Netserver LH 3/LH 3r Power Supply Upgrade Kit - Page 18
- HP LH4r | HP Netserver LH 3/LH 3r Power Supply Upgrade Kit - Page 19
Fan Module Once the power supply cage and module are installed in the server, install the fan module from the Power Supply Upgrade Kit. Server power should still be off, and the covers 1 and 3 should be off the NetServer. The module includes two fans. It mounts directly in front of the existing - HP LH4r | HP Netserver LH 3/LH 3r Power Supply Upgrade Kit - Page 20
Chapter 3 Installing the Fan Module 4. Replace covers 1 and 3. See "Replacing the Covers," in this section, for details. 5. Remove the yellow tamper evident plug (not pictured) from the power supply. Then plug in the power supply cord. The power cord retainer holds the plug in place. To attach the - HP LH4r | HP Netserver LH 3/LH 3r Power Supply Upgrade Kit - Page 21
it snaps into place. Lock the bezel lock with the key provided. 3. Replace all power, telephone, and I/O cables. 4. Push the anti-tip foot in. HP NetServer LH 3r 1. Insert the tabs inside Cover 1 into the slots in the chassis and slide the cover toward the rear. Tighten the thumbscrew at the front - HP LH4r | HP Netserver LH 3/LH 3r Power Supply Upgrade Kit - Page 22
- HP LH4r | HP Netserver LH 3/LH 3r Power Supply Upgrade Kit - Page 23
provided with your original HP NetServer system documentation for the warranty limitations, customer responsibilities, and other terms and conditions. HP Repair and Telephone Support Refer to the Service and Support section of your HP NetServer system documentation for instructions on how to obtain - HP LH4r | HP Netserver LH 3/LH 3r Power Supply Upgrade Kit - Page 24
- HP LH4r | HP Netserver LH 3/LH 3r Power Supply Upgrade Kit - Page 25
A Regulatory Information For regulatory information pertaining to this HP accessory, please refer to the regulatory section of the user guide for the NetServer in which this accessory is installed. 21 - HP LH4r | HP Netserver LH 3/LH 3r Power Supply Upgrade Kit - Page 26
- HP LH4r | HP Netserver LH 3/LH 3r Power Supply Upgrade Kit - Page 27
Index A Accessory kit contents, 3 C Cage installation procedure, 10 Covers removing LH 3r, 7 removing LH3, 5 removing, cautions and warnings, 4 replacing LH 3, 17 replacing LH 3r, 17 F Fan module installation procedure, 15 removal, 10 G Getting help, 19 H Hardware repair warranty information for, 19
-
 1
1 -
 2
2 -
 3
3 -
 4
4 -
 5
5 -
 6
6 -
 7
7 -
8
-
9
-
10
-
11
-
12
-
13
-
14
-
15
-
16
-
17
-
18
-
19
-
20
-
21
-
22
-
23
-
24
-
25
-
26
-
27
 |
 |

HP NetServer LH 3/LH 3r
Power Supply Upgrade Kit
Installation Guide
HP Part Number 5967-2108
Printed in June 1998