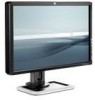
HP LP2480zx HP LP2480zx LCD Monitor User Guide - Page 29
Adjusting the Monitor Settings, Using the On-Screen Display Menu, Save and Return, Cancel
 |
UPC - 883585957767
View all HP LP2480zx manuals
Add to My Manuals
Save this manual to your list of manuals |
Page 29 highlights
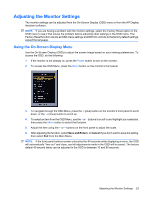
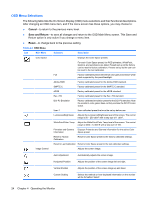
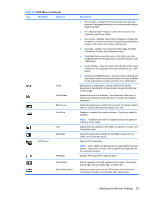
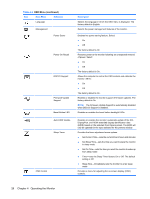
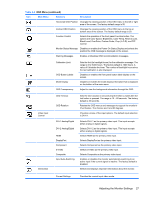
Adjusting the Monitor Settings The monitor settings can be adjusted from the On-Screen Display (OSD) menu or from the HP Display Assistant software. NOTE: If you are having a problem with the monitor settings, select the Factory Reset option in the OSD menu to see if that solves the problem before adjusting other settings in the OSD menu. The Factory Reset function returns all OSD menu settings and DDC/CI controls to the factory default settings, except the language. Using the On-Screen Display Menu Use the On-Screen Display (OSD) to adjust the screen image based on your viewing preferences. To access the OSD, do the following: 1. If the monitor is not already on, press the Power button to turn on the monitor. 2. To access the OSD Menu, press the Menu button on the monitor's front panel. 3. To navigate through the OSD Menu, press the + (plus) button on the monitor's front panel to scroll down, or the - (minus) button to scroll up. 4. To select an item from the OSD Menu, use the + or - buttons to scroll to and highlight your selection, then press the Menu button to select that function. 5. Adjust the item using the + or - buttons on the front panel to adjust the scale. 6. After adjusting the function, select Save and Return, or Cancel if you don't want to save the setting, then select Exit from the Main Menu. NOTE: If the front panel buttons remain untouched for 40 seconds while displaying a menu, the OSD will automatically "time out" and close, and all adjustments made in the OSD will be saved. The factory default 40 second delay can be adjusted in the OSD to between 10 and 60 seconds. Adjusting the Monitor Settings 23
-
 1
1 -
2
-
3
-
4
-
5
-
6
-
7
-
8
-
9
-
10
-
11
-
12
-
13
-
14
-
15
-
16
-
17
-
18
-
19
-
20
-
21
-
22
-
23
-
 24
24 -
 25
25 -
 26
26 -
 27
27 -
 28
28 -
 29
29 -
 30
30 -
 31
31 -
 32
32 -
 33
33 -
 34
34 -
35
-
36
-
37
-
38
-
39
-
40
-
41
-
42
-
43
-
44
-
45
-
46
-
47
-
48
-
49
-
50
-
51
-
52
-
53
-
54
-
55
-
56
-
57
-
58
-
59
 |
 |
