HP LaserJet 9000 HP LaserJet 9000 Series Printer - Getting Started Guide - Page 16
Step 7 Load Trays 2 and 3, To load Tray 2 and Tray 3
 |
View all HP LaserJet 9000 manuals
Add to My Manuals
Save this manual to your list of manuals |
Page 16 highlights
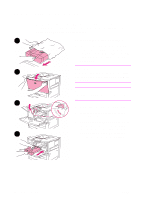
Step 7 Load Trays 2 and 3 This section describes how to load A4- 1 or letter-size paper. For instructions on loading and configuring other sizes and types of media, see the HP LaserJet 9000 Introduce manual (user guide) that came on the CD-ROM. CAUTION To avoid a paper jam, never open a tray 2 while the printer is printing from that tray. To load Tray 2 and Tray 3 1 Pull the tray open until it stops. 2 Load a stack of Letter- or A4-size paper with the top of the stack toward the rear of the tray. For 3 single-sided printing, the side to be printed should be down. For double- sided printing, the first side to be printed should be up. 3 Adjust the left (Y) paper guide by pressing the tab on the guide and sliding it to the mark for A4- or lettersize paper. 14 Printer Setup ENWW
-
 1
1 -
2
-
3
-
4
-
5
-
6
-
7
-
8
-
9
-
10
-
 11
11 -
 12
12 -
 13
13 -
 14
14 -
 15
15 -
 16
16 -
 17
17 -
 18
18 -
 19
19 -
 20
20 -
 21
21 -
22
-
23
-
24
-
25
-
26
-
27
-
28
-
29
-
30
-
31
-
32
-
33
-
34
-
35
-
36
-
37
-
38
-
39
-
40
-
41
-
42
-
43
-
44
 |
 |
