HP LaserJet M4349 HP LaserJet M4349x MFP - User Guide - Page 23
Interface ports, Locking and unlocking optional accessories
 |
View all HP LaserJet M4349 manuals
Add to My Manuals
Save this manual to your list of manuals |
Page 23 highlights
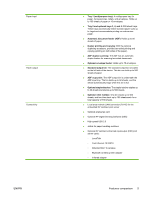
5 Memory DIMM 6 HP Jetdirect print server (EIO card) 7 Hard-disk accessory (EIO card) 8 Storage cabinet/stand (Q5970A) 9 3-bin mailbox (Q5692A) 10 Staple cartridge (C8091A) 11 Print cartridge (CE267C) 12 HP LaserJet Analog Fax Accessory 300 (Q3701A) See Order parts, accessories, and supplies on page 228 for information about ordering accessories and supplies. NOTE: The device accommodates up to three optional 500-sheet feeders. HP recommends using a cabinet when using the optional 500-sheet feeders. Interface ports 1 2 3 4 1 EIO slot 2 Network connection (embedded HP Jetdirect print server) 3 High-speed USB 2.0 device port 4 Telephone-line connection (for the optional analog-fax accessory) Locking and unlocking optional accessories For more stability to prevent the device from tipping over, the optional 500-sheet feeders and the cabinet are automatically locked to the bottom of the device. When accessories are installed, verify that the lock on each accessory is in the rear (locked) position. To unlock the accessories, slide the lever to the forward (unlocked) position. ENWW Walkaround 9
-
 1
1 -
2
-
3
-
4
-
5
-
6
-
7
-
8
-
9
-
10
-
11
-
12
-
13
-
14
-
15
-
16
-
17
-
 18
18 -
 19
19 -
 20
20 -
 21
21 -
 22
22 -
 23
23 -
 24
24 -
 25
25 -
 26
26 -
 27
27 -
 28
28 -
29
-
30
-
31
-
32
-
33
-
34
-
35
-
36
-
37
-
38
-
39
-
40
-
41
-
42
-
43
-
44
-
45
-
46
-
47
-
48
-
49
-
50
-
51
-
52
-
53
-
54
-
55
-
56
-
57
-
58
-
59
-
60
-
61
-
62
-
63
-
64
-
65
-
66
-
67
-
68
-
69
-
70
-
71
-
72
-
73
-
74
-
75
-
76
-
77
-
78
-
79
-
80
-
81
-
82
-
83
-
84
-
85
-
86
-
87
-
88
-
89
-
90
-
91
-
92
-
93
-
94
-
95
-
96
-
97
-
98
-
99
-
100
-
101
-
102
-
103
-
104
-
105
-
106
-
107
-
108
-
109
-
110
-
111
-
112
-
113
-
114
-
115
-
116
-
117
-
118
-
119
-
120
-
121
-
122
-
123
-
124
-
125
-
126
-
127
-
128
-
129
-
130
-
131
-
132
-
133
-
134
-
135
-
136
-
137
-
138
-
139
-
140
-
141
-
142
-
143
-
144
-
145
-
146
-
147
-
148
-
149
-
150
-
151
-
152
-
153
-
154
-
155
-
156
-
157
-
158
-
159
-
160
-
161
-
162
-
163
-
164
-
165
-
166
-
167
-
168
-
169
-
170
-
171
-
172
-
173
-
174
-
175
-
176
-
177
-
178
-
179
-
180
-
181
-
182
-
183
-
184
-
185
-
186
-
187
-
188
-
189
-
190
-
191
-
192
-
193
-
194
-
195
-
196
-
197
-
198
-
199
-
200
-
201
-
202
-
203
-
204
-
205
-
206
-
207
-
208
-
209
-
210
-
211
-
212
-
213
-
214
-
215
-
216
-
217
-
218
-
219
-
220
-
221
-
222
-
223
-
224
-
225
-
226
-
227
-
228
-
229
-
230
-
231
-
232
-
233
-
234
-
235
-
236
-
237
-
238
-
239
-
240
-
241
-
242
-
243
-
244
-
245
-
246
-
247
-
248
-
249
-
250
-
251
-
252
-
253
-
254
-
255
-
256
-
257
-
258
-
259
-
260
-
261
-
262
-
263
-
264
-
265
-
266
-
267
-
268
-
269
-
270
-
271
-
272
-
273
-
274
-
275
-
276
-
277
-
278
-
279
-
280
-
281
-
282
 |
 |