HP LaserJet P4015 HP LaserJet P4010 and P4510 Series - User Guide - Page 167
Control panel message, Description, Recommended action, CAUTION, PAPER WRAPPED AROUND FUSER
 |
View all HP LaserJet P4015 manuals
Add to My Manuals
Save this manual to your list of manuals |
Page 167 highlights
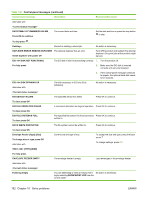
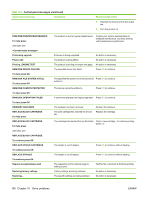
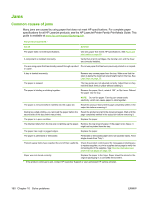
Table 10-1 Control-panel messages (continued) Control panel message Description Recommended action To use another tray press OK alternates with MANUALLY FEED [TYPE] [SIZE] For help press MANUALLY FEED OUTPUT STACK Then press OK to print second sides The first side of a manual duplex job has been 1. printed and the product is waiting for you to insert the output stack to complete the second side. 2. Load the output stack into Tray 1, maintaining the same orientation with printed side down. To continue printing, press OK. No job to cancel The stop button was pressed, but there is No action is necessary. no active job or buffered data to cancel. The message is displayed for approximately 2 seconds before the product returns to the ready state. NON HP SUPPLY INSTALLED Economode disabled The product has detected that the print cartridge is not a genuine HP supply. If you believe you purchased a genuine HP supply, call the HP fraud hotline Any product repair required as a result of using non-HP supplies or unauthorized supplies is not covered under the product warranty. To continue printing, press OK. NON HP SUPPLY INSTALLED alternates with For help press The product has detected that the print cartridge is not a genuine HP supply. If you believe you purchased a genuine HP supply, call the HP fraud hotline. Any product repair required as a result of using non-HP supplies or unauthorized supplies is not covered under the product warranty. To continue printing, press OK. Output bin FULL Remove all paper from bin The output bin is full, and printing cannot continue. Empty the bin so that the current print job can finish. Output bin FULL Remove all paper from bin The output bin is full, but it is not needed for Empty the bin before sending a job to that bin. the current print job. alternates with PAPER WRAPPED AROUND FUSER For help press A jam has occurred because paper has wrapped around the fuser. CAUTION: The fuser can be hot while the product is in use. Wait for the fuser to cool before handling it. 1. Turn the product off. 2. Remove the rear output bin. 3. Press the blue tabs to remove the fuser. 4. Remove the jammed paper. ENWW Interpret control-panel messages 155
-
 1
1 -
2
-
3
-
4
-
5
-
6
-
7
-
8
-
9
-
10
-
11
-
12
-
13
-
14
-
15
-
16
-
17
-
18
-
19
-
20
-
21
-
22
-
23
-
24
-
25
-
26
-
27
-
28
-
29
-
30
-
31
-
32
-
33
-
34
-
35
-
36
-
37
-
38
-
39
-
40
-
41
-
42
-
43
-
44
-
45
-
46
-
47
-
48
-
49
-
50
-
51
-
52
-
53
-
54
-
55
-
56
-
57
-
58
-
59
-
60
-
61
-
62
-
63
-
64
-
65
-
66
-
67
-
68
-
69
-
70
-
71
-
72
-
73
-
74
-
75
-
76
-
77
-
78
-
79
-
80
-
81
-
82
-
83
-
84
-
85
-
86
-
87
-
88
-
89
-
90
-
91
-
92
-
93
-
94
-
95
-
96
-
97
-
98
-
99
-
100
-
101
-
102
-
103
-
104
-
105
-
106
-
107
-
108
-
109
-
110
-
111
-
112
-
113
-
114
-
115
-
116
-
117
-
118
-
119
-
120
-
121
-
122
-
123
-
124
-
125
-
126
-
127
-
128
-
129
-
130
-
131
-
132
-
133
-
134
-
135
-
136
-
137
-
138
-
139
-
140
-
141
-
142
-
143
-
144
-
145
-
146
-
147
-
148
-
149
-
150
-
151
-
152
-
153
-
154
-
155
-
156
-
157
-
158
-
159
-
160
-
161
-
 162
162 -
 163
163 -
 164
164 -
 165
165 -
 166
166 -
 167
167 -
 168
168 -
 169
169 -
 170
170 -
 171
171 -
 172
172 -
173
-
174
-
175
-
176
-
177
-
178
-
179
-
180
-
181
-
182
-
183
-
184
-
185
-
186
-
187
-
188
-
189
-
190
-
191
-
192
-
193
-
194
-
195
-
196
-
197
-
198
-
199
-
200
-
201
-
202
-
203
-
204
-
205
-
206
-
207
-
208
-
209
-
210
-
211
-
212
-
213
-
214
-
215
-
216
-
217
-
218
-
219
-
220
-
221
-
222
-
223
-
224
-
225
-
226
-
227
-
228
-
229
-
230
-
231
-
232
-
233
-
234
-
235
-
236
-
237
-
238
-
239
-
240
-
241
-
242
-
243
-
244
-
245
-
246
 |
 |