HP M5035 HP LaserJet M5025/M5035 MFP - User Guide - Page 211
Replace the print cartridge, and then close the upper-right door - toner - how to replace
 |
UPC - 882780574533
View all HP M5035 manuals
Add to My Manuals
Save this manual to your list of manuals |
Page 211 highlights
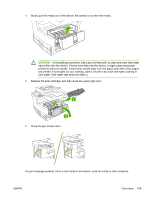
4. Slowly pull the media out of the device. Be careful to not tear the media. CAUTION Avoid spilling loose toner. Use a dry, lint-free cloth, to clean any toner that might have fallen into the device. If loose toner falls into the device, it might cause temporary problems with print quality. Loose toner should clear from the paper path after a few pages are printed. If toner gets on your clothing, wipe it off with a dry cloth and wash clothing in cold water. (Hot water sets toner into fabric.) 5. Replace the print cartridge, and then close the upper-right door. 6. Close the jam access door. If a jam message persists, there is still media in the device. Look for media in other locations. ENWW Clear jams 199
-
 1
1 -
2
-
3
-
4
-
5
-
6
-
7
-
8
-
9
-
10
-
11
-
12
-
13
-
14
-
15
-
16
-
17
-
18
-
19
-
20
-
21
-
22
-
23
-
24
-
25
-
26
-
27
-
28
-
29
-
30
-
31
-
32
-
33
-
34
-
35
-
36
-
37
-
38
-
39
-
40
-
41
-
42
-
43
-
44
-
45
-
46
-
47
-
48
-
49
-
50
-
51
-
52
-
53
-
54
-
55
-
56
-
57
-
58
-
59
-
60
-
61
-
62
-
63
-
64
-
65
-
66
-
67
-
68
-
69
-
70
-
71
-
72
-
73
-
74
-
75
-
76
-
77
-
78
-
79
-
80
-
81
-
82
-
83
-
84
-
85
-
86
-
87
-
88
-
89
-
90
-
91
-
92
-
93
-
94
-
95
-
96
-
97
-
98
-
99
-
100
-
101
-
102
-
103
-
104
-
105
-
106
-
107
-
108
-
109
-
110
-
111
-
112
-
113
-
114
-
115
-
116
-
117
-
118
-
119
-
120
-
121
-
122
-
123
-
124
-
125
-
126
-
127
-
128
-
129
-
130
-
131
-
132
-
133
-
134
-
135
-
136
-
137
-
138
-
139
-
140
-
141
-
142
-
143
-
144
-
145
-
146
-
147
-
148
-
149
-
150
-
151
-
152
-
153
-
154
-
155
-
156
-
157
-
158
-
159
-
160
-
161
-
162
-
163
-
164
-
165
-
166
-
167
-
168
-
169
-
170
-
171
-
172
-
173
-
174
-
175
-
176
-
177
-
178
-
179
-
180
-
181
-
182
-
183
-
184
-
185
-
186
-
187
-
188
-
189
-
190
-
191
-
192
-
193
-
194
-
195
-
196
-
197
-
198
-
199
-
200
-
201
-
202
-
203
-
204
-
205
-
 206
206 -
 207
207 -
 208
208 -
 209
209 -
 210
210 -
 211
211 -
 212
212 -
 213
213 -
 214
214 -
 215
215 -
 216
216 -
217
-
218
-
219
-
220
-
221
-
222
-
223
-
224
-
225
-
226
-
227
-
228
-
229
-
230
-
231
-
232
-
233
-
234
-
235
-
236
-
237
-
238
-
239
-
240
-
241
-
242
-
243
-
244
-
245
-
246
-
247
-
248
-
249
-
250
-
251
-
252
-
253
-
254
-
255
-
256
-
257
-
258
-
259
-
260
-
261
-
262
-
263
-
264
-
265
-
266
-
267
-
268
-
269
-
270
-
271
-
272
-
273
-
274
-
275
-
276
-
277
-
278
-
279
-
280
-
281
-
282
-
283
-
284
-
285
-
286
-
287
-
288
-
289
-
290
-
291
-
292
-
293
-
294
-
295
-
296
-
297
-
298
-
299
-
300
 |
 |
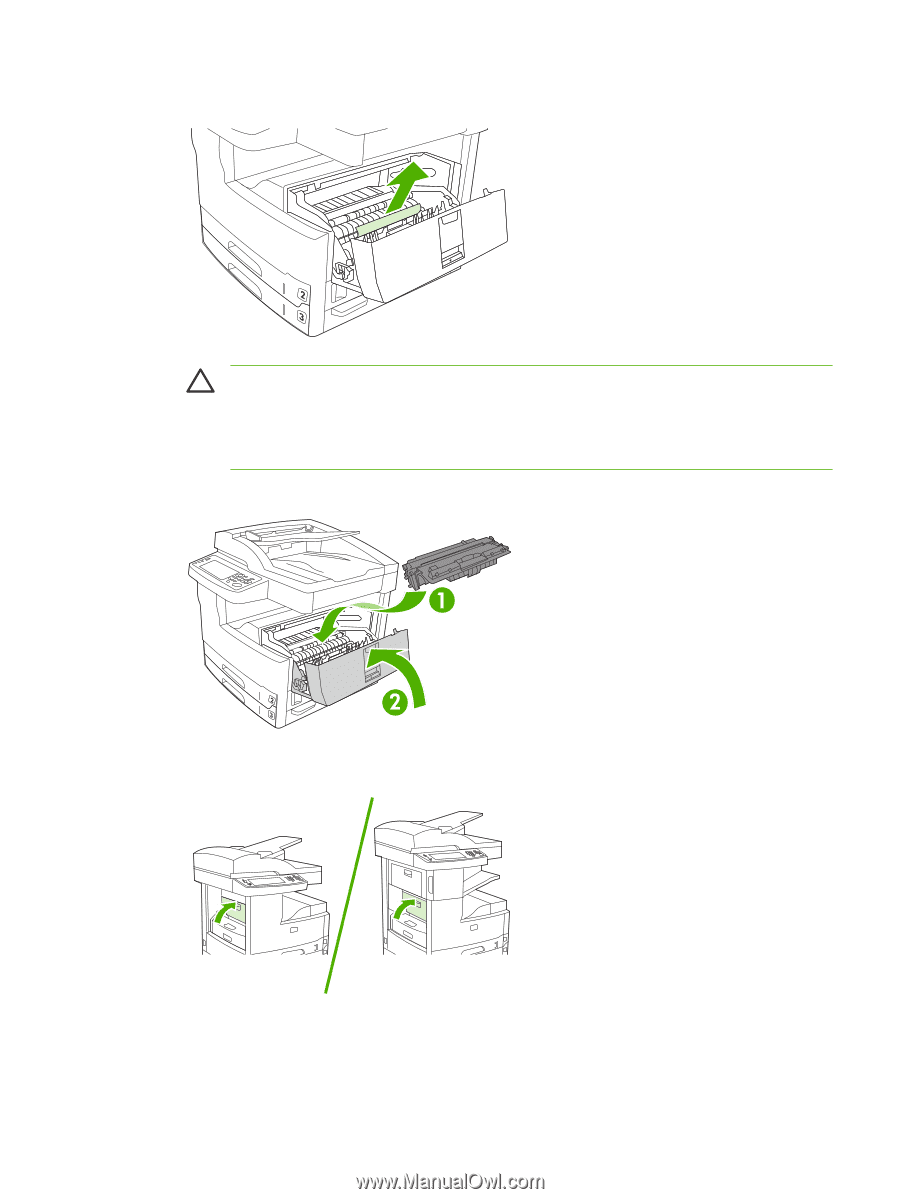
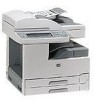
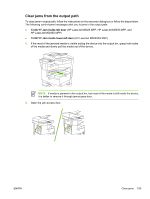
4.
Slowly pull the media out of the device. Be careful to not tear the media.
CAUTION
Avoid spilling loose toner. Use a dry, lint-free cloth, to clean any toner that might
have fallen into the device. If loose toner falls into the device, it might cause temporary
problems with print quality. Loose toner should clear from the paper path after a few pages
are printed. If toner gets on your clothing, wipe it off with a dry cloth and wash clothing in
cold water. (Hot water sets toner into fabric.)
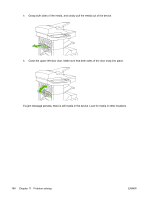
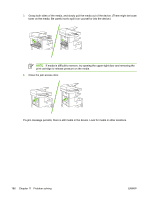
5.
Replace the print cartridge, and then close the upper-right door.
6.
Close the jam access door.
If a jam message persists, there is still media in the device. Look for media in other locations.
ENWW
Clear jams
199