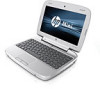
HP Mini 100e HP Mini 100e Education Edition - Maintenance and Service Guide
HP Mini 100e - Education Edition Manual
 |
View all HP Mini 100e manuals
Add to My Manuals
Save this manual to your list of manuals |
HP Mini 100e manual content summary:
- HP Mini 100e | HP Mini 100e Education Edition - Maintenance and Service Guide - Page 1
HP Mini 100e Education Edition Maintenance and Service Guide - HP Mini 100e | HP Mini 100e Education Edition - Maintenance and Service Guide - Page 2
in the express warranty statements accompanying such products and services. Nothing herein should be construed as constituting an additional warranty. HP shall not be liable for technical or editorial errors or omissions contained herein. First Edition: July 2010 Document Part Number: 616944-001 - HP Mini 100e | HP Mini 100e Education Edition - Maintenance and Service Guide - Page 3
Safety warning notice WARNING! To reduce the possibility of heat-related injuries or of overheating the device, do not place the device directly on your lap or obstruct the device air vents. Use the device only on a hard, flat surface. Do not allow another hard surface, such as an adjoining optional - HP Mini 100e | HP Mini 100e Education Edition - Maintenance and Service Guide - Page 4
iv Safety warning notice - HP Mini 100e | HP Mini 100e Education Edition - Maintenance and Service Guide - Page 5
...18 Mass storage devices ...20 Miscellaneous parts ...21 Sequential part number listing ...22 4 Removal and replacement procedures ...24 Preliminary replacement requirements 24 Tools required ...24 Service considerations ...24 Plastic parts ...24 Cables and connectors 24 Drive handling - HP Mini 100e | HP Mini 100e Education Edition - Maintenance and Service Guide - Page 6
Setup Utility 62 Displaying system information 63 Restoring factory default settings in Setup Utility 63 Exiting Setup Utility ...63 Updating the BIOS ...63 Determining the BIOS version 64 Downloading a BIOS update 64 6 Specifications ...65 Computer specifications ...65 25.65-cm (10.1-in), Wide - HP Mini 100e | HP Mini 100e Education Edition - Maintenance and Service Guide - Page 7
(microphone) ...75 Audio-out (headphone) ...76 External monitor ...77 RJ-11 (modem) ...78 RJ-45 (network) ...79 Universal Serial Bus ...80 9 Power cord set requirements ...81 Requirements for all countries and regions 81 Requirements for specific countries and regions 82 10 Recycling ...83 Battery - HP Mini 100e | HP Mini 100e Education Edition - Maintenance and Service Guide - Page 8
viii - HP Mini 100e | HP Mini 100e Education Edition - Maintenance and Service Guide - Page 9
1 Product description Category Product Name Processor Chipset Graphics Display panel Memory Hard drive Optical drive Diskette drive Audio/Visual Modem Ethernet Wireless Description HP Mini 100e Education Edition Intel® Atom™ N455 1.66-GHz processor, 512-KB Level 2 cache Intel NM10 Express Intel® - HP Mini 100e | HP Mini 100e Education Edition - Maintenance and Service Guide - Page 10
system Serviceability Description SD Card Reader supporting: ● MultiMediaCard (MMC) ● Secure Digital High Capacity (SDHC) Memory Card Audio-in (stereo microphone) Audio-out (headphone) RJ-45 (Ethernet, includes link and activity lights) 2 USB 2.0 (1 powered) 3-pin AC power VGA, supporting up - HP Mini 100e | HP Mini 100e Education Edition - Maintenance and Service Guide - Page 11
2 External component identification Top Top cover Component Network light Description Off: All network functions are off. On: The computer is connected to a wired network or an integrated wireless device, such as a wireless local area network (WLAN) device, is on. Top 3 - HP Mini 100e | HP Mini 100e Education Edition - Maintenance and Service Guide - Page 12
TouchPad Component (1) TouchPad off indicator (2) TouchPad zone (3) Left TouchPad button (4) Right TouchPad button Description Turns the TouchPad on and off. Quickly double-tap the TouchPad off indicator to turn the TouchPad on and off. Moves the pointer and selects or activates items on - HP Mini 100e | HP Mini 100e Education Edition - Maintenance and Service Guide - Page 13
Lights Component (1) TouchPad off indicator (2) Caps lock light (3) Power light (4) Mute light (5) Wireless light Description ● On: The TouchPad is off. ● Off: The devices are off. ● On: An integrated wireless device, such as a wireless local area network (WLAN) device, is on. Top 5 - HP Mini 100e | HP Mini 100e Education Edition - Maintenance and Service Guide - Page 14
applications key (4) Function keys Description Executes frequently used system functions when pressed in combination with a function key. Displays the Windows Start menu. Displays a shortcut menu for items beneath the pointer. Execute frequently used system functions when pressed in combination - HP Mini 100e | HP Mini 100e Education Edition - Maintenance and Service Guide - Page 15
hold the power button for at least 5 seconds to turn off the computer. To learn more about your power settings, select Start > Control Panel > System and Security > Power Options, or refer to the HP Notebook Reference Guide (Windows) or Computer > Control Center > System > Power Management (Linux - HP Mini 100e | HP Mini 100e Education Edition - Maintenance and Service Guide - Page 16
Front Component (1) Vent (2) Speaker Description Enables airflow to cool internal components. NOTE: The computer fan starts up automatically to cool internal components and prevent overheating. It is normal for the internal fan to cycle on and off during routine operation. Produces sound. 8 - HP Mini 100e | HP Mini 100e Education Edition - Maintenance and Service Guide - Page 17
disabled. Connects an optional external microphone. Supports the following digital card formats: ● MultiMediaCard (MMC) ● Secure Digital High Capacity (SDHC) Card Connects an optional USB device. When this port is the only USB port in use, it functions as a powered USB port. Blinking amber: Data is - HP Mini 100e | HP Mini 100e Education Edition - Maintenance and Service Guide - Page 18
error. ● White: The computer is connected to external power and the battery is charged. Connects an external VGA monitor or projector. Connects an optional USB device. When this port is the only USB port in use, it functions as a powered USB port. Connects an optional modem cable. 10 Chapter - HP Mini 100e | HP Mini 100e Education Edition - Maintenance and Service Guide - Page 19
Display Component (1) Internal microphone (2) Webcam light (3) Webcam Description Records sound. On: The webcam is in use. Records video and captures still photographs. Display 11 - HP Mini 100e | HP Mini 100e Education Edition - Maintenance and Service Guide - Page 20
handle (select models only) (2) Service access cover (3) Battery locking latch Description Allows you to carry the computer. CAUTION: To reduce the risk of damaging the computer, close the computer before picking it up by the handle. Provides access to the hard drive bay, a memory module slot - HP Mini 100e | HP Mini 100e Education Edition - Maintenance and Service Guide - Page 21
Wireless antenna Component Description WLAN antenna* Sends and receives wireless signals to communicate with wireless local area networks (WLAN). *The antenna is not visible from the outside of the computer. For optimal transmission, keep the areas immediately around the antenna free from - HP Mini 100e | HP Mini 100e Education Edition - Maintenance and Service Guide - Page 22
technical support. NOTE: The serial number label may vary according to model. Component (1) Part number (2) Serial number (3) Product name (4) Warranty period Description The number that provides specific information about the product's hardware components. The part number helps a service - HP Mini 100e | HP Mini 100e Education Edition - Maintenance and Service Guide - Page 23
Computer major components Computer major components 15 - HP Mini 100e | HP Mini 100e Education Edition - Maintenance and Service Guide - Page 24
list of display assembly spare parts. Keyboard ● For use in Brazil part number 615965-001) TouchPad buttons (includesTouchPad board and cables) Base enclosure For models with a handle For models without a handle Speaker Memory module (PC3-10600, 667-MHz, DDR3, shared) 1-GB 2-GB RTC battery - HP Mini 100e | HP Mini 100e Education Edition - Maintenance and Service Guide - Page 25
System board (includes Intel Atom N455, 1.66-GHz processor, 512-KB L2 cache, and replacement thermal material) Modem Power connector (includes cable) NOTE: The power connector is included in the base enclosure, spare part number 615960-001. Battery 6-cell lithium-ion (Li-ion) battery (2.2-Ah, 47-Wh - HP Mini 100e | HP Mini 100e Education Edition - Maintenance and Service Guide - Page 26
Display assembly components Item Description (1) Display bezel 18 Chapter 3 Illustrated parts catalog Spare part number 619578-001 - HP Mini 100e | HP Mini 100e Education Edition - Maintenance and Service Guide - Page 27
-001) (6) WLAN antenna and cable (included in the Cable Kit, spare part number 615961-001) (7) Display back cover (includes logo and shielding) For models with a handle For models without a handle (not illustrated) Spare part number 622745-001 619574-001 615968-001 619577-001 626122-001 Display - HP Mini 100e | HP Mini 100e Education Edition - Maintenance and Service Guide - Page 28
NOTE: The hard drive spare part kit includes a bracket, screws, grommets, and Mylar tape. Item Description (1) Hard drive connector (2) Hard drive (160-GB, 5400-RPM) (3) Grommets (included in the hard drive kit) (4) Bracket (included in the hard drive kit) Spare part number 619571-001 621406-001 - HP Mini 100e | HP Mini 100e Education Edition - Maintenance and Service Guide - Page 29
Miscellaneous parts Description Spare part number 40-watt adapter, RC/V 2W 609949-001 Power cords For use in Brazil 490371-201 For use in Europe 490371-021 For use in Kit (includes 4 LCD display bezel bumpers) 615963-001 Screw Kit 615962-001 56K modem 620340-001 Miscellaneous parts 21 - HP Mini 100e | HP Mini 100e Education Edition - Maintenance and Service Guide - Page 30
use in Brazil 615967-281 Keyboard for use in Thailand 615968-001 Display panel-25.65-cm (10.1-in) Wide Super VGA (WSVGA) 1024x600 LCD 615969-001 System board (includes Intel Atom N455, 1.66-GHz processor, 512-KB L2 cache, and replacement thermal material) 22 Chapter 3 Illustrated parts catalog - HP Mini 100e | HP Mini 100e Education Edition - Maintenance and Service Guide - Page 31
Kit (includes keyboard frame and service access cover for use in all countries and regions except Brazil) Fan and heatsink assembly (includes thermal replacement material) Display back cover (for models with a handle) Display bezel 56K modem 160-GB, 5400-RPM hard drive 1-GB memory module (PC3 - HP Mini 100e | HP Mini 100e Education Edition - Maintenance and Service Guide - Page 32
work area to prevent damage. Plastic parts CAUTION: Using excessive force during disassembly and reassembly can damage plastic parts. Use care when handling the plastic parts. Apply pressure only at the points designated in the maintenance instructions. Cables and connectors CAUTION: When servicing - HP Mini 100e | HP Mini 100e Education Edition - Maintenance and Service Guide - Page 33
. If a drive must be mailed, place the drive in a bubble pack mailer or other suitable form of protective packaging and label the package "FRAGILE." Preliminary replacement requirements 25 - HP Mini 100e | HP Mini 100e Education Edition - Maintenance and Service Guide - Page 34
Networks built into many integrated circuits provide some protection, but in many cases, ESD contains enough power at all and can work perfectly throughout a normal cycle. Or internal layers, reducing its life expectancy. CAUTION: To V 5,000 V 26 Chapter 4 Removal and replacement procedures - HP Mini 100e | HP Mini 100e Education Edition - Maintenance and Service Guide - Page 35
to a properly grounded work surface and use properly grounded tools and equipment. ● Use conductive field service tools, such as work area free of nonconductive materials, such as ordinary plastic assembly aids and Styrofoam. ● Handle ESD-sensitive components, parts, and assemblies by the case - HP Mini 100e | HP Mini 100e Education Edition - Maintenance and Service Guide - Page 36
straps (heel, toe, or boot straps) can be used at standing workstations and are compatible with most types of shoes or boots. On conductive floors or dissipative mats with hard ties to the ground ● Field service kits ● Static awareness labels ● Material-handling packages and replacement procedures - HP Mini 100e | HP Mini 100e Education Edition - Maintenance and Service Guide - Page 37
note of each screw size and location during removal and replacement. Service tag When you order parts or request information, provide the computer serial number and model number provided on the service tag, affixed to the bottom of the computer. NOTE: The service tag label may vary according to - HP Mini 100e | HP Mini 100e Education Edition - Maintenance and Service Guide - Page 38
and then unplugging the AC adapter from the computer. Remove the battery: CAUTION: Removing a battery that is the sole power source for the computer can cause loss of information. To prevent loss of information, save your work and initiate Hibernation or shut down the computer through the operating - HP Mini 100e | HP Mini 100e Education Edition - Maintenance and Service Guide - Page 39
in Brazil Spare part number 619575-001 627093-001 Before removing the service access cover, follow power from the computer by first unplugging the power cord from the AC outlet and then unplugging the AC adapter from the computer. 4. Remove the battery (see Battery on page 30) Remove the service - HP Mini 100e | HP Mini 100e Education Edition - Maintenance and Service Guide - Page 40
computer by first unplugging the power cord from the AC outlet and then unplugging the AC adapter from the computer. 4. Remove the following components: a. Battery (see Battery on page 30) b. Service access cover (see Service access cover on page 31) Remove the memory module: 1. Spread the retaining - HP Mini 100e | HP Mini 100e Education Edition - Maintenance and Service Guide - Page 41
2. Remove the memory module (2) by pulling the module away from the slot at an angle. NOTE: Memory modules are designed with a notch (3) to prevent incorrect insertion into the memory module slot. Reverse this procedure to install a memory module. Component replacement procedures 33 - HP Mini 100e | HP Mini 100e Education Edition - Maintenance and Service Guide - Page 42
to the computer. 3. Disconnect the power from the computer by first unplugging the power cord from the AC outlet and then unplugging the AC adapter from the computer. 4. Remove the following components: a. Battery (see Battery on page 30) b. Service access cover (see Service access cover on page 31 - HP Mini 100e | HP Mini 100e Education Edition - Maintenance and Service Guide - Page 43
that regulates wireless devices in your country or region. If you replace the module and then receive a warning message, remove the module to restore device functionality, and then contact technical support through Help and Support. Before removing the WLAN module, follow these steps: 1. Shut down - HP Mini 100e | HP Mini 100e Education Edition - Maintenance and Service Guide - Page 44
Hard drive connector Spare part number 621406-001 619571- power from the computer by first unplugging the power cord from the AC outlet and then unplugging the AC adapter from the computer. 4. Remove the following components: a. Battery (see Battery on page 30) b. Service access cover (see Service - HP Mini 100e | HP Mini 100e Education Edition - Maintenance and Service Guide - Page 45
2. Use the Mylar tab (2) to pull the assembly straight up to disconnect it, and then remove the assembly. If it is necessary to replace the hard drive bracket, follow these steps: 1. Remove the 4 Phillips 3.0x3.0 screws (1) that secure the hard drive bracket to the hard drive. 2. Using the Mylar - HP Mini 100e | HP Mini 100e Education Edition - Maintenance and Service Guide - Page 46
. Reverse this procedure to install the hard drive assembly. Keyboard Description ● For use in Brazil ● For use in France ● For use in French Canada ● For use in Germany ● For use in Italy 38 Chapter 4 Removal and replacement procedures Spare part number 615967-201 615967-051 615967-121 615967-041 - HP Mini 100e | HP Mini 100e Education Edition - Maintenance and Service Guide - Page 47
by first unplugging the power cord from the AC outlet and then unplugging the AC adapter from the computer. 4. Remove the following components: a. Battery (see Battery on page 30). b. Service access cover (see Service access cover on page 31) Remove the keyboard: 1. Remove the 2 Phillips 2.0x5 - HP Mini 100e | HP Mini 100e Education Edition - Maintenance and Service Guide - Page 48
then along the outside edges of the keyboard to release the plastic tabs. 4. Remove the keyboard cover (2). 5. Lift up on the top edge of the keyboard and hold it at an angle. 6. Release the zero insertion force (ZIF) connector (1) to which the keyboard cable is attached. 40 Chapter 4 Removal and - HP Mini 100e | HP Mini 100e Education Edition - Maintenance and Service Guide - Page 49
computer by first unplugging the power cord from the AC outlet and then unplugging the AC adapter from the computer. 4. Remove the following components: a. Battery (see Battery on page 30). b. Service access cover (see Service access cover on page 31). c. Keyboard (see Keyboard on page 38) Remove - HP Mini 100e | HP Mini 100e Education Edition - Maintenance and Service Guide - Page 50
button cables are connected. 6. Remove the cables (2). 7. Remove the 2 Phillips PM2.0×5.5 screws (1) that secure the top cover to the base enclosure. 42 Chapter 4 Removal and replacement procedures - HP Mini 100e | HP Mini 100e Education Edition - Maintenance and Service Guide - Page 51
cover (2) straight up to remove it from the base enclosure. If it is necessary to replace the TouchPad buttons, follow these steps: NOTE: The TouchPad buttons and cables are available using spare part number 615967-001. 1. Remove the 2 Phillips 2.0x4.0 screws (1) that secure the TouchPad buttons to - HP Mini 100e | HP Mini 100e Education Edition - Maintenance and Service Guide - Page 52
Disconnect the TouchPad cable (2) from the TouchPad. If it is necessary to replace the security cable slot bracket, follow these steps: NOTE: The security cable slot bracket is available in the top cover kit, spare part number 615965-001. 1. Remove the 2 Phillips 2.0x4.0 screws (1) that secure the - HP Mini 100e | HP Mini 100e Education Edition - Maintenance and Service Guide - Page 53
Description Speaker Spare part number 619573-001 power cord from the AC outlet and then unplugging the AC adapter from the computer. 4. Remove the following components: a. Battery (see Battery on page 30) b. Service access cover (see Service access cover on page 31) c. Keyboard (see Keyboard - HP Mini 100e | HP Mini 100e Education Edition - Maintenance and Service Guide - Page 54
secure the speaker to the base enclosure. 3. Remove the speaker (3) from the base enclosure. Reverse this procedure to install the speaker. 46 Chapter 4 Removal and replacement procedures - HP Mini 100e | HP Mini 100e Education Edition - Maintenance and Service Guide - Page 55
the computer by first unplugging the power cord from the AC outlet and then unplugging the AC adapter from the computer. 4. Remove the following components: a. Battery (see Battery on page 30) b. Service access cover (see Service access cover on page 31) c. Keyboard (see Keyboard on page 38) d. Top - HP Mini 100e | HP Mini 100e Education Edition - Maintenance and Service Guide - Page 56
routing channel (3) on the system board. CAUTION: Support the display assembly when removing the following screws. Failure to support the display assembly can result in damage to the assembly to the computer. 5. Remove the display assembly (3). 48 Chapter 4 Removal and replacement procedures - HP Mini 100e | HP Mini 100e Education Edition - Maintenance and Service Guide - Page 57
off with a flexible tool and peel them away from the bezel. The rubber bumpers are available in the Rubber Kit, spare part number 615963-001. 7. If it is necessary to replace the display bezel, follow these steps: a. Flex the inside edges of the top (1), the left and right sides (2), and then the - HP Mini 100e | HP Mini 100e Education Edition - Maintenance and Service Guide - Page 58
Phillips 2.0x3.0 screw (2) that secures the webcam module to the display back cover. c. Remove the webcam (3). 9. If it is necessary to replace the display panel, follow these steps: a. Remove the 6 Phillips 2.5×5.0 screws (1) and the 2 Phillips 2.0x3.0 screws (2) that secure the display panel to - HP Mini 100e | HP Mini 100e Education Edition - Maintenance and Service Guide - Page 59
follow these steps: a. Remove the 2 Phillips 2.0×2.0 screws (1) that secure each hinge to the display back cover. b. Remove the hinges (2). 11. If it is necessary to replace the display panel cable, follow these steps: a. Peel back the Mylar protection on the back of the display panel (1). Component - HP Mini 100e | HP Mini 100e Education Edition - Maintenance and Service Guide - Page 60
b. Disconnect the display panel cable (2). 12. If it is necessary to replace the wireless antenna transceiver and cable, detach the cable from the adhesive (1) that secures it to the display back cover, and then remove the cable (2). - HP Mini 100e | HP Mini 100e Education Edition - Maintenance and Service Guide - Page 61
the computer by first unplugging the power cord from the AC outlet and then unplugging the AC adapter from the computer. 4. Remove the following components: a. Battery (see Battery on page 30) b. Service access cover (see Service access cover on page 31) c. Keyboard (see Keyboard on page 38) d. Top - HP Mini 100e | HP Mini 100e Education Edition - Maintenance and Service Guide - Page 62
unplugging the power cord from the AC outlet and then unplugging the AC adapter from the computer. 4. Remove the following components: a. Battery (see Battery on page 30) b. Service access cover (see Service access cover on page 31) c. RTC battery (see RTC battery on page 34) d. Memory module (see - HP Mini 100e | HP Mini 100e Education Edition - Maintenance and Service Guide - Page 63
(select models only) on page 53) When replacing the system board, be sure that the following components are removed from the defective system board and installed on the replacement system board: ● WLAN module (see WLAN module on page 35) ● Memory module (see Memory module on page 32) ● RTC battery - HP Mini 100e | HP Mini 100e Education Edition - Maintenance and Service Guide - Page 64
modem Spare part number power cord from the AC outlet and then unplugging the AC adapter from the computer. 4. Remove the following components: a. Battery (see Battery on page 30) b. Service access cover (see Service access cover on page 31) c. RTC battery (see RTC battery on page 34) d. Memory - HP Mini 100e | HP Mini 100e Education Edition - Maintenance and Service Guide - Page 65
Speaker on page 45) k. Handle (see Handle (select models only) on page 53) l. System board (see System board on page 54) Remove the modem: 1. Disconnect the modem jack cable. 2. Remove the 2 Phillips 2.0×3.0 screws (1) that secure the modem to the system board. Component replacement procedures 57 - HP Mini 100e | HP Mini 100e Education Edition - Maintenance and Service Guide - Page 66
3. Remove the modem (2). Reverse this procedure to install the modem. 58 Chapter 4 Removal and replacement procedures - HP Mini 100e | HP Mini 100e Education Edition - Maintenance and Service Guide - Page 67
unplugging the power cord from the AC outlet and then unplugging the AC adapter from the computer. 4. Remove the following components: a. Battery (see Battery on page 30) b. Service access cover (see Service access cover on page 31) c. RTC battery (see RTC battery on page 34) d. Memory module (see - HP Mini 100e | HP Mini 100e Education Edition - Maintenance and Service Guide - Page 68
3. Follow this order when loosening the screws. 3. Remove the Phillips 2.0x2.5 screw (2) that secures the heat sink to the system board. 60 Chapter 4 Removal and replacement procedures - HP Mini 100e | HP Mini 100e Education Edition - Maintenance and Service Guide - Page 69
is removed. Thermal paste (1) is used on the processor (2), and thermal tape (3) is used on the Northbridge chip (4). Replacement thermal material is included with the heat sink assembly and system board spare part kits. Reverse this procedure to install the fan and heat sink assembly. Component - HP Mini 100e | HP Mini 100e Education Edition - Maintenance and Service Guide - Page 70
(BIOS), controls communication between all the input and output devices on the system (such as disk drives, display, keyboard, takes effect immediately. Navigating and selecting in Setup Utility Setup Utility does not support the TouchPad. Navigation and selection are by keystroke. ● To choose a - HP Mini 100e | HP Mini 100e Education Edition - Maintenance and Service Guide - Page 71
. Updating the BIOS Updated versions of the BIOS may be available on the HP Web site. Most BIOS updates on the HP Web site are packaged in compressed files called SoftPaqs. Some download packages contain a file named Readme.txt, which contains information regarding installing and troubleshooting the - HP Mini 100e | HP Mini 100e Education Edition - Maintenance and Service Guide - Page 72
using the AC adapter. Do not download or install a BIOS update while the computer is running on battery power, docked in an optional docking device, or connected to an optional power source. During the download and installation, follow these instructions: Do not disconnect power from the computer by - HP Mini 100e | HP Mini 100e Education Edition - Maintenance and Service Guide - Page 73
, WLAN module, and 1 wireless antenna 1.46 kg 3.2 lb 10.1-in. LCD, equipped with a 6-cell battery, hard drive, 1-GB memory, WLAN module, and 1 wireless antenna 1.57 kg 3.5 lb Input power Operating voltage 19.5 V dc @ 2.05 A 19.5 V dc @ 2.05 A Operating current 1.58 A 1.58 A Temperature - HP Mini 100e | HP Mini 100e Education Edition - Maintenance and Service Guide - Page 74
25.65-cm (10.1-in), Wide Super VGA (WSVGA) display specifications Dimensions Height Width Diagonal Number of colors Contrast ratio Brightness Pixel resolution Pitch Format × 0.2088 mm 1024x600 RGB vertical stripe White LED +/-45° horizontal, +20/-45° vertical (typical) 66 Chapter 6 Specifications - HP Mini 100e | HP Mini 100e Education Edition - Maintenance and Service Guide - Page 75
30 ms Disc rotational speed 5400 rpm *1 GB = 1 billion bytes when referring to hard drive storage capacity. Actual accessible capacity is less. Actual drive specifications may differ slightly. NOTE: Certain restrictions and exclusions apply. Contact technical support for details. Hard drive - HP Mini 100e | HP Mini 100e Education Edition - Maintenance and Service Guide - Page 76
7 Backup and recovery Recovery after a system failure is as good as your most recent backup. As you add new software and data files, you should continue to back up your system on a regular basis to maintain a reasonably current backup. Select the section in this chapter that applies to the operating - HP Mini 100e | HP Mini 100e Education Edition - Maintenance and Service Guide - Page 77
only) ● Scheduling automatic backups (select models only) ● Recovering individual files ● Restoring the computer to its factory state NOTE: For detailed instructions, perform a search for these topics in Help and Support. NOTE: In case of system instability, HP recommends that you print the recovery - HP Mini 100e | HP Mini 100e Education Edition - Maintenance and Service Guide - Page 78
Backup and Restore. 2. Follow the on-screen instructions to recover your system settings, your computer (select models only), or your files. NOTE: Windows includes the User Account Control feature to improve the security of your computer. You may be prompted for your permission or password for tasks - HP Mini 100e | HP Mini 100e Education Edition - Maintenance and Service Guide - Page 79
on an external drive) is easily accessible. To order a Windows 7 operating system DVD, go to http://www.hp.com/support, select your country or region, and then follow the on-screen instructions. You can also order the DVD by calling technical support. For contact information, refer to the Worldwide - HP Mini 100e | HP Mini 100e Education Edition - Maintenance and Service Guide - Page 80
your personal information. Windows provides the following options: ● Creating restore points ● Restoring your system configuration to a previous state NOTE: For detailed instructions, perform a search for these topics in Help and Support. NOTE: In case of system instability, HP recommends that you - HP Mini 100e | HP Mini 100e Education Edition - Maintenance and Service Guide - Page 81
. The recovery process reinstalls the original operating system as well as software and drivers. Software, drivers, and updates not installed by HP must be manually reinstalled. Personal files must be restored from a backup. To recover your operating system and programs, follow these steps: 1. If - HP Mini 100e | HP Mini 100e Education Edition - Maintenance and Service Guide - Page 82
tool reinstalls the original operating system and HP programs and drivers that were installed at the factory. Software, drivers, and updates not installed by HP must be manually reinstalled. Personal files must be restored from a backup. To restore the computer from the partition, follow these - HP Mini 100e | HP Mini 100e Education Edition - Maintenance and Service Guide - Page 83
8 Connector pin assignments Audio-in (microphone) Pin Signal 1 Audio signal in 2 Audio signal in 3 Ground Audio-in (microphone) 75 - HP Mini 100e | HP Mini 100e Education Edition - Maintenance and Service Guide - Page 84
Audio-out (headphone) Pin Signal 1 Audio out, left channel 2 Audio out, right channel 3 Ground 76 Chapter 8 Connector pin assignments - HP Mini 100e | HP Mini 100e Education Edition - Maintenance and Service Guide - Page 85
External monitor Pin Signal 1 Red analog 2 Green analog 3 Blue analog 4 Not connected 5 Ground 6 Ground analog 7 Ground analog 8 Ground analog 9 +5 VDC 10 Ground 11 Monitor detect 12 DDC 2B data 13 Horizontal sync 14 Vertical sync 15 DDC 2B clock External monitor 77 - HP Mini 100e | HP Mini 100e Education Edition - Maintenance and Service Guide - Page 86
RJ-11 (modem) Pin Signal 1 Unused 2 Tip 3 Ring 4 Unused 5 Unused 6 Unused 78 Chapter 8 Connector pin assignments - HP Mini 100e | HP Mini 100e Education Edition - Maintenance and Service Guide - Page 87
RJ-45 (network) Pin Signal 1 Transmit + 2 Transmit - 3 Receive + 4 Unused 5 Unused 6 Receive - 7 Unused 8 Unused RJ-45 (network) 79 - HP Mini 100e | HP Mini 100e Education Edition - Maintenance and Service Guide - Page 88
Universal Serial Bus Pin Signal 1 +5 VDC 2 Data - 3 Data + 4 Ground 80 Chapter 8 Connector pin assignments - HP Mini 100e | HP Mini 100e Education Edition - Maintenance and Service Guide - Page 89
for use in the country or region where the equipment is purchased. Power cord sets for use in other countries and regions must meet the a nominal voltage rating of 125 or 250 V AC, as required by the power system of each country or region. ● The appliance coupler must meet the mechanical - HP Mini 100e | HP Mini 100e Education Edition - Maintenance and Service Guide - Page 90
Requirements for specific countries and regions Country/region Accredited agency Applicable note number Australia 5. The flexible cord must be Type VCTF, 3-conductor, 0.75-mm² conductor size. Power cord set fittings (appliance coupler and wall plug) must bear the certification mark of the - HP Mini 100e | HP Mini 100e Education Edition - Maintenance and Service Guide - Page 91
. This HP product contains mercury in the backlight in the display assembly that might require special handling at end-of-life. Disposal instructions. Specific details, such as screw sizes, quantities, and locations, and component shapes and sizes, can vary from one computer model to another. Battery - HP Mini 100e | HP Mini 100e Education Edition - Maintenance and Service Guide - Page 92
Perform the following steps to disassemble the display assembly: 1. Remove all screw covers (1) and screws (2) that secure the display bezel to the display assembly. 2. Lift up and out on the left and right inside edges (1) and the top and bottom inside edges (2) of the display bezel until the bezel - HP Mini 100e | HP Mini 100e Education Edition - Maintenance and Service Guide - Page 93
4. Disconnect all display panel cables (1) from the display inverter and remove the inverter (2). 5. Remove all screws (1) that secure the display panel assembly to the display back cover. 6. Remove the display panel assembly (2) from the display back cover. 7. Turn the display panel assembly upside - HP Mini 100e | HP Mini 100e Education Edition - Maintenance and Service Guide - Page 94
10. Remove the display panel frame (2) from the display panel. 11. Remove the screws (1) that secure the backlight cover to the display panel. 12. Lift the top edge of the backlight cover (2) and swing it outward. 13. Remove the backlight cover. 14. Turn the display panel right-side up. 86 Chapter - HP Mini 100e | HP Mini 100e Education Edition - Maintenance and Service Guide - Page 95
15. Remove the backlight cables (1) from the clip (2) in the display panel. 16. Turn the display panel upside down. WARNING! The backlight contains mercury. Exercise caution when removing and handling the backlight to avoid damaging this component and causing exposure to the mercury. 17. Remove the - HP Mini 100e | HP Mini 100e Education Edition - Maintenance and Service Guide - Page 96
18. Remove the backlight from the backlight frame. 19. Disconnect the display panel cable (1) from the LCD panel. 20. Remove the screws (2) that secure the LCD panel to the display rear panel. 21. Release the LCD panel (3) from the display rear panel. 22. Release the tape (4) that secures the LCD - HP Mini 100e | HP Mini 100e Education Edition - Maintenance and Service Guide - Page 97
and Restore 69, 70 base enclosure, spare part number 16 battery replacing 30 spare part number 17 battery bay, identifying 12 battery light, identifying 10 battery locking latch, identifying 12 battery release latch, identifying 12 BIOS determining version 64 downloading an update 64 updating 63 - HP Mini 100e | HP Mini 100e Education Edition - Maintenance and Service Guide - Page 98
6 Windows logo 6 L latches battery locking 12 battery release 12 lights battery 10 caps lock 5 mute 5 network activity 9 network connection 9 power 5 TouchPad off indicator 5 webcam 11 wireless 5 M memory module product description 1 removal 32 spare part number 16 90 Index microphone (audio - HP Mini 100e | HP Mini 100e Education Edition - Maintenance and Service Guide - Page 99
language 62 displaying system information 63 exiting 63 navigating 62 restoring default settings 63 selecting 62 starting 62 slot, security cable 9 speaker identifying 8 illustrated 8, 47 removal 45 spare part number 45, 47 specifications device 65 display 66 hard drive 67 static-shielding materials
-
 1
1 -
 2
2 -
 3
3 -
 4
4 -
 5
5 -
 6
6 -
 7
7 -
8
-
9
-
10
-
11
-
12
-
13
-
14
-
15
-
16
-
17
-
18
-
19
-
20
-
21
-
22
-
23
-
24
-
25
-
26
-
27
-
28
-
29
-
30
-
31
-
32
-
33
-
34
-
35
-
36
-
37
-
38
-
39
-
40
-
41
-
42
-
43
-
44
-
45
-
46
-
47
-
48
-
49
-
50
-
51
-
52
-
53
-
54
-
55
-
56
-
57
-
58
-
59
-
60
-
61
-
62
-
63
-
64
-
65
-
66
-
67
-
68
-
69
-
70
-
71
-
72
-
73
-
74
-
75
-
76
-
77
-
78
-
79
-
80
-
81
-
82
-
83
-
84
-
85
-
86
-
87
-
88
-
89
-
90
-
91
-
92
-
93
-
94
-
95
-
96
-
97
-
98
-
99
 |
 |

HP Mini 100e Education Edition
Maintenance and Service Guide