HP NetServer AA 6200 HP Netserver AA Solution Administrator's Guide v - Page 185
Commit Configuration Changes, identical, Warning
 |
View all HP NetServer AA 6200 manuals
Add to My Manuals
Save this manual to your list of manuals |
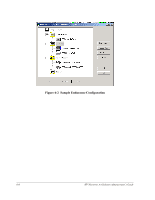
Page 185 highlights
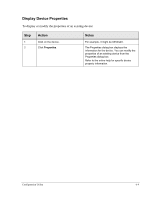
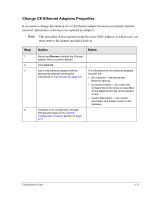
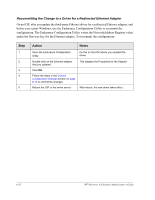
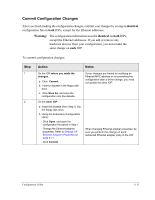
Commit Configuration Changes After you finish making the configuration changes, commit your changes by saving an identical configuration file on both IOPs, except for the Ethernet addresses. Warning: The configuration information must be identical on both IOPs, except the Ethernet addresses. If you add or remove any hardware devices from your configuration, you must make the same change on each IOP. To commit configuration changes: Step 1 2 Action Notes On the IOP where you made the changes: a. Click Commit. b. Insert a diskette in the floppy disk drive. c. Click Save As, and save the configuration onto the diskette. On the other IOP: a. Insert the diskette (from Step 1) into the floppy disk drive. b. Using the Endurance Configuration Utility: - Click Open, and open the configuration file saved in Step 1. - Change the Ethernet adapter properties. Refer to Change CE Ethernet Adapters Properties on page 6-11. - Click Commit. If your changes are limited to modifying an Ethernet MAC address or re-committing the configuration after a driver change, you need not update the other IOP. When changing Ethernet adapter properties, be sure you perform the change on each redirected Ethernet adapter (rail) on the IOP. Configuration Utility 6-13
-
 1
1 -
2
-
3
-
4
-
5
-
6
-
7
-
8
-
9
-
10
-
11
-
12
-
13
-
14
-
15
-
16
-
17
-
18
-
19
-
20
-
21
-
22
-
23
-
24
-
25
-
26
-
27
-
28
-
29
-
30
-
31
-
32
-
33
-
34
-
35
-
36
-
37
-
38
-
39
-
40
-
41
-
42
-
43
-
44
-
45
-
46
-
47
-
48
-
49
-
50
-
51
-
52
-
53
-
54
-
55
-
56
-
57
-
58
-
59
-
60
-
61
-
62
-
63
-
64
-
65
-
66
-
67
-
68
-
69
-
70
-
71
-
72
-
73
-
74
-
75
-
76
-
77
-
78
-
79
-
80
-
81
-
82
-
83
-
84
-
85
-
86
-
87
-
88
-
89
-
90
-
91
-
92
-
93
-
94
-
95
-
96
-
97
-
98
-
99
-
100
-
101
-
102
-
103
-
104
-
105
-
106
-
107
-
108
-
109
-
110
-
111
-
112
-
113
-
114
-
115
-
116
-
117
-
118
-
119
-
120
-
121
-
122
-
123
-
124
-
125
-
126
-
127
-
128
-
129
-
130
-
131
-
132
-
133
-
134
-
135
-
136
-
137
-
138
-
139
-
140
-
141
-
142
-
143
-
144
-
145
-
146
-
147
-
148
-
149
-
150
-
151
-
152
-
153
-
154
-
155
-
156
-
157
-
158
-
159
-
160
-
161
-
162
-
163
-
164
-
165
-
166
-
167
-
168
-
169
-
170
-
171
-
172
-
173
-
174
-
175
-
176
-
177
-
178
-
179
-
 180
180 -
 181
181 -
 182
182 -
 183
183 -
 184
184 -
 185
185 -
 186
186 -
 187
187 -
 188
188 -
 189
189 -
 190
190 -
191
-
192
-
193
-
194
-
195
-
196
-
197
-
198
-
199
-
200
-
201
-
202
-
203
-
204
-
205
-
206
-
207
-
208
-
209
-
210
-
211
-
212
-
213
-
214
-
215
-
216
-
217
-
218
-
219
-
220
-
221
-
222
-
223
-
224
-
225
-
226
-
227
-
228
-
229
-
230
-
231
-
232
-
233
-
234
-
235
-
236
-
237
-
238
-
239
-
240
-
241
-
242
-
243
-
244
-
245
-
246
-
247
-
248
-
249
-
250
-
251
-
252
-
253
-
254
-
255
-
256
-
257
-
258
-
259
-
260
-
261
-
262
-
263
-
264
-
265
-
266
-
267
-
268
-
269
-
270
-
271
-
272
 |
 |
