HP P6000 HP StorageWorks Disk enclosure front power UID interconnect board rep - Page 3
Installing the power UID interconnect board, Disconnect the cable from the interconnect board.
 |
View all HP P6000 manuals
Add to My Manuals
Save this manual to your list of manuals |
Page 3 highlights
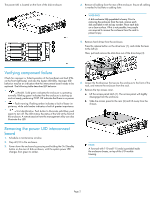
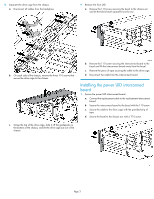
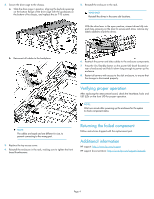
8. Separate the drive cage from the chassis. a. Disconnect all cables from the backplane. 9. Remove the front UID. a. Remove the T-10 screw securing the bezel to the chassis ear and let the black bezel separate from the ear. b. On each side of the chassis, remove the three T-10 screws that secure the drive cage to the chassis. b. Remove the T-10 screw securing the interconnect board to the bezel and lift the interconnect board away from the bezel. c. Remove the piece of tape securing the cable to the drive cage. d. Disconnect the cable from the interconnect board. Installing the power UID interconnect board 1. Secure the power UID interconnect board. a. Connect the replacement cable to the replacement interconnect board. b. Secure the interconnect board to the bezel with the T-10 screw. c. Secure the cable to the drive cage with the provided strip of tape. d. Secure the bezel to the chassis ear with a T-10 screw. c. Grasp the top of the drive cage, slide it off the guideposts on the bottom of the chassis, and lift the drive cage just out of the chassis. Page 3
-
 1
1 -
 2
2 -
 3
3 -
 4
4
 |
 |
