HP P6000 HP StorageWorks Disk enclosure front power UID interconnect board rep - Page 4
Verifying proper operation, Returning the failed component
 |
View all HP P6000 manuals
Add to My Manuals
Save this manual to your list of manuals |
Page 4 highlights
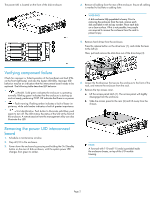
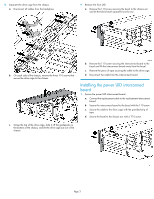
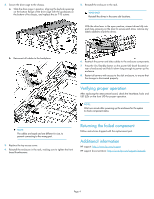
2. Secure the drive cage to the chassis. a. Slide the drive cage in position, aligning the keyhole openings on the bottom flange of the drive cage with the guideposts on the bottom of he chassis, and replace the six T-10 screws. 5. Reinstall the enclosure in the rack. WARNING! Reinstall the drives in the same slot locations. With the drive lever in the open position, reinsert drives fully into each bay, pressing on the lever to secure each drive, remove any labels added to mark the drives. b. Reconnect all cables to the backplane. 6. Reattach the power and data cables to the enclosure components. 7. Press the On/Standby button on the power UID bezel (located at rear of enclosure) and hold it down long enough to power up the enclosure. 8. Restart all servers with access to the disk enclosure, to ensure that the storage is discovered properly. Verifying proper operation After replacing the interconnect board, check the heartbeat, fault, and UID LEDs on the front UID for proper operation. NOTE: Wait one minute after powering up the enclosure for the system to check component status. NOTE: The cables are keyed and are different in size, to prevent connecting to the wrong port. 3. Replace the top access cover. 4. Reinstall the enclosure in the rack, making sure to tighten the front bezel thumbscrews. Returning the failed component Follow instructions shipped with the replacement part. Additional information HP support: http://www.hp.com/support HP support documentation: http://www.hp.com/support/manuals Page 4
-
 1
1 -
 2
2 -
 3
3 -
 4
4
 |
 |
