HP PSC 2400 HP PSC 2400 Photosmart series All-in-One - (English) Reference Gui - Page 37
change photo menu print options, Number of Copies, Image Size, Paper Size, Borders & Frames
 |
View all HP PSC 2400 manuals
Add to My Manuals
Save this manual to your list of manuals |
Page 37 highlights
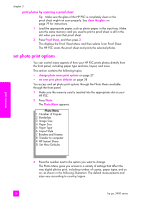
Number of Copies Copies: 1 > Press OK when done. Borderless 1. Off 2. On Paper Size 1. Letter 2. 4 x 6 3. A4 Paper Type 1. Automatic 2. Plain Paper 3. Premium Photo 4. Photo Paper 5. Everyday Photo 6. PhotQual Inkjet 7. Premium Inkjet 8. Brochure Glossy 9. Brochure Matte 0. Iron-On use a photo memory card Image Size 1. 4 x 6 inch 2. 5 x 7 inch 3. 8 x 10 inch 4. 2½ x 3¼ inch 5. 3 x 4 inch Layout Style 1. Paper Saver 2. Album (Portrait Page) 3. Album (Landscape Page) Borders & Frames 1. None 2. Rectangle (thin frame) 3. Rectangle (thick frame) 4. Oval (no frame) 5. Oval (thin frame) 6. Oval (thick frame) Set New Defaults 1. No 2. Yes change photo menu print options You change each of the Photo Menu print options in the same general way. 1 Press Photo, and then press the number next to the option you want to change. You can scroll through the Photo Menu by pressing on the front panel to see all the options. The currently selected option is highlighted, and its default setting (if any) appears at the bottom of the menu. 2 Make the change to the setting, and then press OK. Note: Press Photo again to exit the Photo Menu and return to the photo display. borderless print This setting turns borderless printing on or off. Borderless printing lets you create professional quality photo prints. When the Borderless option is on, the Image Size, Layout Style, and Borders and Frames options become grayed out on the Photo Menu. Any choices on other menus that are unsupported for borderless printing are also grayed out. You still need to select a paper size and paper type, and load the appropriate paper in the input tray. memory card reference guide 27
-
 1
1 -
2
-
3
-
4
-
5
-
6
-
7
-
8
-
9
-
10
-
11
-
12
-
13
-
14
-
15
-
16
-
17
-
18
-
19
-
20
-
21
-
22
-
23
-
24
-
25
-
26
-
27
-
28
-
29
-
30
-
31
-
 32
32 -
 33
33 -
 34
34 -
 35
35 -
 36
36 -
 37
37 -
 38
38 -
 39
39 -
 40
40 -
 41
41 -
 42
42 -
43
-
44
-
45
-
46
-
47
-
48
-
49
-
50
-
51
-
52
-
53
-
54
-
55
-
56
-
57
-
58
-
59
-
60
-
61
-
62
-
63
-
64
-
65
-
66
-
67
-
68
-
69
-
70
-
71
-
72
-
73
-
74
-
75
-
76
-
77
-
78
-
79
-
80
-
81
-
82
-
83
-
84
-
85
-
86
-
87
-
88
-
89
-
90
-
91
-
92
-
93
-
94
-
95
-
96
-
97
-
98
-
99
-
100
-
101
-
102
-
103
-
104
-
105
-
106
-
107
-
108
-
109
-
110
-
111
-
112
-
113
-
114
-
115
-
116
-
117
-
118
-
119
-
120
-
121
-
122
-
123
-
124
-
125
-
126
-
127
-
128
-
129
-
130
-
131
-
132
-
133
-
134
-
135
-
136
-
137
-
138
-
139
-
140
-
141
-
142
-
143
-
144
-
145
-
146
-
147
-
148
-
149
-
150
-
151
-
152
-
153
-
154
-
155
-
156
-
157
-
158
-
159
-
160
-
161
-
162
-
163
-
164
-
165
-
166
 |
 |