HP PSC 2400 HP PSC 2400 Photosmart series All-in-One - (English) Reference Gui - Page 77
set fax options, redial a busy or unanswered number automatically
 |
View all HP PSC 2400 manuals
Add to My Manuals
Save this manual to your list of manuals |
Page 77 highlights
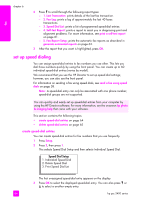
fax 3 Press 3. This selects Set New Defaults. 4 Press OK. use the fax features set fax options There are numerous fax options that you can set, such as controlling whether the HP PSC redials a busy number automatically. Review this section for information on changing fax options. This section contains the following topics: • redial a busy or unanswered number automatically on page 67 • use error correction mode (ECM) on page 68 • set automatic reduction for incoming faxes on page 68 • adjust the volume on page 68 • change the answer ring pattern (distinctive ringing) on page 68 • set the date and time on page 69 • set the paper size on page 69 • set tone or pulse dialing on page 70 • set backup fax reception on page 70 redial a busy or unanswered number automatically You can set your HP PSC to redial a busy or an unanswered number automatically. The default setting for Busy Redial is Redial. The default setting for No Answer Redial is No Redial. 1 Press Setup. 2 Do one of the following: - To change the Busy Redial setting, press 4, and then press 3. This selects Advanced Fax Setup and then selects Busy Redial. - To change the No Answer Redial setting press 4, and then press 4 again. This selects Advanced Fax Setup and then selects No Answer Redial. Advanced Fax Setup 1. Fax Reports Setup 2. Answer Ring Pattern 3. Busy Redial 4. No Answer Redial 5. Automatic Reduction 6. Backup Fax Reception 7. Error Correction Mode Busy Redial 1. Redial 2. No Redial No Answer Redial 1. No Redial 2. Redial 3 Press to select Redial or No Redial. 4 Press OK. reference guide 67
-
 1
1 -
2
-
3
-
4
-
5
-
6
-
7
-
8
-
9
-
10
-
11
-
12
-
13
-
14
-
15
-
16
-
17
-
18
-
19
-
20
-
21
-
22
-
23
-
24
-
25
-
26
-
27
-
28
-
29
-
30
-
31
-
32
-
33
-
34
-
35
-
36
-
37
-
38
-
39
-
40
-
41
-
42
-
43
-
44
-
45
-
46
-
47
-
48
-
49
-
50
-
51
-
52
-
53
-
54
-
55
-
56
-
57
-
58
-
59
-
60
-
61
-
62
-
63
-
64
-
65
-
66
-
67
-
68
-
69
-
70
-
71
-
 72
72 -
 73
73 -
 74
74 -
 75
75 -
 76
76 -
 77
77 -
 78
78 -
 79
79 -
 80
80 -
 81
81 -
 82
82 -
83
-
84
-
85
-
86
-
87
-
88
-
89
-
90
-
91
-
92
-
93
-
94
-
95
-
96
-
97
-
98
-
99
-
100
-
101
-
102
-
103
-
104
-
105
-
106
-
107
-
108
-
109
-
110
-
111
-
112
-
113
-
114
-
115
-
116
-
117
-
118
-
119
-
120
-
121
-
122
-
123
-
124
-
125
-
126
-
127
-
128
-
129
-
130
-
131
-
132
-
133
-
134
-
135
-
136
-
137
-
138
-
139
-
140
-
141
-
142
-
143
-
144
-
145
-
146
-
147
-
148
-
149
-
150
-
151
-
152
-
153
-
154
-
155
-
156
-
157
-
158
-
159
-
160
-
161
-
162
-
163
-
164
-
165
-
166
 |
 |