HP Pavilion 15-bj000 Maintenance and Service Guide - Page 73
installed UNDER the keyboard shield, Reverse this procedure to install the touchpad.
 |
View all HP Pavilion 15-bj000 manuals
Add to My Manuals
Save this manual to your list of manuals |
Page 73 highlights
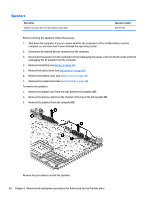
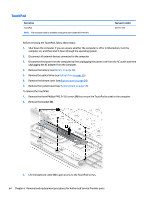
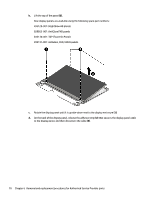
4. Remove the three broadhead Phillips PM2.0×2.0 screws (2) that secure the TouchPad to the computer. 5. Lift the bottom of touchpad up, and then pull it away from computer.(3). NOTE: When installing the TouchPad, note that the metal protrusion that extents from the touchpad is installed UNDER the keyboard shield (4). Reverse this procedure to install the touchpad. Component replacement procedures 65
-
 1
1 -
2
-
3
-
4
-
5
-
6
-
7
-
8
-
9
-
10
-
11
-
12
-
13
-
14
-
15
-
16
-
17
-
18
-
19
-
20
-
21
-
22
-
23
-
24
-
25
-
26
-
27
-
28
-
29
-
30
-
31
-
32
-
33
-
34
-
35
-
36
-
37
-
38
-
39
-
40
-
41
-
42
-
43
-
44
-
45
-
46
-
47
-
48
-
49
-
50
-
51
-
52
-
53
-
54
-
55
-
56
-
57
-
58
-
59
-
60
-
61
-
62
-
63
-
64
-
65
-
66
-
67
-
 68
68 -
 69
69 -
 70
70 -
 71
71 -
 72
72 -
 73
73 -
 74
74 -
 75
75 -
 76
76 -
 77
77 -
 78
78 -
79
-
80
-
81
-
82
-
83
-
84
-
85
-
86
-
87
-
88
-
89
-
90
-
91
-
92
-
93
-
94
-
95
-
96
-
97
-
98
-
99
-
100
-
101
-
102
-
103
-
104
-
105
-
106
-
107
-
108
-
109
-
110
-
111
-
112
-
113
-
114
-
115
-
116
-
117
-
118
 |
 |
4.
Remove the three broadhead Phillips PM2.0×2.0 screws
(2)
that secure the TouchPad to the computer.
5.
Lift the bottom of touchpad up, and then pull it away from computer.
(3)
.
NOTE:
When installing the TouchPad, note that the metal protrusion that extents from the touchpad is
installed UNDER the keyboard shield
(4)
.
Reverse this procedure to install the touchpad.
Component replacement procedures
65