HP Pavilion 17-ab000 Maintenance and Service Guide - Page 55
Memory module, Update BIOS before adding memory modules, Support, Software & drivers
 |
View all HP Pavilion 17-ab000 manuals
Add to My Manuals
Save this manual to your list of manuals |
Page 55 highlights
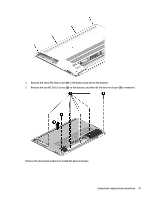
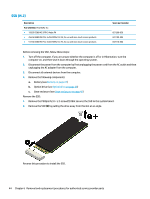
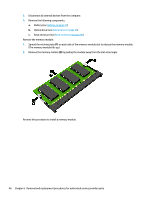
Memory module Description Memory For products with 6th generation processors 2 GB 2133 MHz 1.2 v DDR4 shared 4 GB 2133 MHz 1.2 v DDR4 shared 8 GB 2133 MHz 1.2 v DDR4 shared For products with 7th generation processors 4 GB 2400 MHz 1.2 v SODIMM DDR4 shared 8 GB 2400 MHz 1.2 v SODIMM DDR4 shared 2 GB 2400 MHz 1.2 v SODIMM DDR4 shared For products with 8th generation processors 8 GB 2666 MHz 1.2 v SODIMM DDR4 shared 4 GB 2666 MHz 1.2 v SODIMM DDR4 shared Spare part number 851379-005 820569-005 820570-005 862397-855 862398-855 864271-855 937236-855 L10598-855 Update BIOS before adding memory modules Before adding new memory, make sure you update the computer to the latest BIOS. CAUTION: Failure to update the computer to the latest BIOS prior to installing new memory may result in various system problems. To update BIOS: 1. Navigate to http:\\www.hp.com. 2. Select Support , and then select Software & drivers. 3. In the Enter my HP model number box, type the computer model information, and then select Find my product. -orSelect Identify now. 4. Select the link for the computer model. 5. Select the language and the operating system. 6. Under the downloads heading, select the BIOS link. 7. Select the link for the most recent BIOS. 8. Select the Download button, and then follow the on-screen instructions. Before removing a memory module, follow these steps: 1. Turn off the computer. If you are unsure whether the computer is off or in Hibernation, turn the computer on, and then shut it down through the operating system. 2. Disconnect the power from the computer by first unplugging the power cord from the AC outlet and then unplugging the AC adapter from the computer. Component replacement procedures 45
-
 1
1 -
2
-
3
-
4
-
5
-
6
-
7
-
8
-
9
-
10
-
11
-
12
-
13
-
14
-
15
-
16
-
17
-
18
-
19
-
20
-
21
-
22
-
23
-
24
-
25
-
26
-
27
-
28
-
29
-
30
-
31
-
32
-
33
-
34
-
35
-
36
-
37
-
38
-
39
-
40
-
41
-
42
-
43
-
44
-
45
-
46
-
47
-
48
-
49
-
 50
50 -
 51
51 -
 52
52 -
 53
53 -
 54
54 -
 55
55 -
 56
56 -
 57
57 -
 58
58 -
 59
59 -
 60
60 -
61
-
62
-
63
-
64
-
65
-
66
-
67
-
68
-
69
-
70
-
71
-
72
-
73
-
74
-
75
-
76
-
77
-
78
-
79
-
80
-
81
-
82
-
83
-
84
-
85
-
86
-
87
-
88
-
89
-
90
-
91
-
92
-
93
-
94
-
95
-
96
-
97
-
98
-
99
-
100
-
101
-
102
-
103
-
104
 |
 |
