HP Pavilion g3100 Upgrading and Servicing Guide - Page 18
into the holes labeled, on the chassis.
 |
View all HP Pavilion g3100 manuals
Add to My Manuals
Save this manual to your list of manuals |
Page 18 highlights
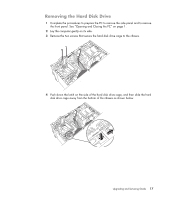
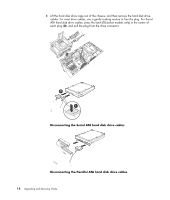
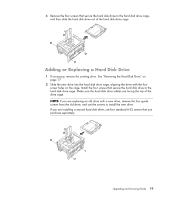
4 Slide the HP Pocket Media Drive bay, diskette (floppy), or hard disk drive completely into the front of the chassis. Align the two screw holes on the chassis with the two screw holes on the side of the drive, and then attach the two screws. For the HP Pocket Media Drive bay and diskette (floppy) drive, make sure to insert the screw into the holes labeled (1) on the chassis. For a hard disk drive, make sure to insert the screw into the holes labeled (HDD) on the chassis. 5 Complete the procedures to replace the front panel, replace the side panel, and close the PC. See "Opening and Closing the PC" on page 1. 14 Upgrading and Servicing Guide
-
 1
1 -
2
-
3
-
4
-
5
-
6
-
7
-
8
-
9
-
10
-
11
-
12
-
 13
13 -
 14
14 -
 15
15 -
 16
16 -
 17
17 -
 18
18 -
 19
19 -
 20
20 -
 21
21 -
 22
22 -
 23
23 -
24
-
25
-
26
-
27
-
28
-
29
-
30
-
31
-
32
 |
 |

14
Upgrading and Servicing Guide
4
Slide the HP Pocket Media Drive bay, diskette (floppy), or hard disk drive completely
into the front of the chassis. Align the two screw holes on the chassis with the two
screw holes on the side of the drive, and then attach the two screws. For the HP Pocket
Media Drive bay and diskette (floppy) drive, make sure to insert the screw into the
holes labeled (
1
) on the chassis. For a hard disk drive, make sure to insert the screw
into the holes labeled (
HDD
) on the chassis.
5
Complete the procedures to replace the front panel, replace the side panel, and close
the PC. See “Opening and Closing the PC” on page 1.