HP Pavilion p6400 Upgrade and Service - Page 23
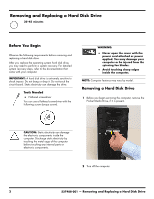
Replacing a Hard Disk Drive
 |
View all HP Pavilion p6400 manuals
Add to My Manuals
Save this manual to your list of manuals |
Page 23 highlights
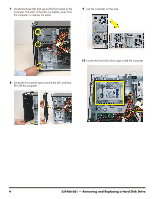
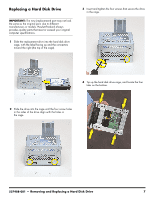
Replacing a Hard Disk Drive IMPORTANT: The new (replacement) part may not look the same as the original part, due to different manufacturers or models. Hewlett-Packard always provides quality parts that meet or exceed your original computer specifications. 1 Slide the replacement drive into the hard disk drive cage, with the label facing up and the connectors toward the right (the top of the cage). 3 Insert and tighten the four screws that secure the drive in the cage. 4 Tip up the hard disk drive cage, and locate the four tabs on the bottom. 2 Slide the drive into the cage until the four screw holes in the sides of the drive align with the holes in the cage. 537488-001 - Removing and Replacing a Hard Disk Drive 7
-
 1
1 -
2
-
3
-
4
-
5
-
6
-
7
-
8
-
9
-
10
-
11
-
12
-
13
-
14
-
15
-
16
-
17
-
 18
18 -
 19
19 -
 20
20 -
 21
21 -
 22
22 -
 23
23 -
 24
24 -
 25
25 -
 26
26 -
 27
27 -
 28
28 -
29
-
30
-
31
-
32
-
33
-
34
-
35
-
36
-
37
-
38
-
39
-
40
-
41
-
42
-
43
-
44
-
45
-
46
-
47
-
48
-
49
-
50
 |
 |

537488-001
— Removing and Replacing a Hard Disk Drive
7
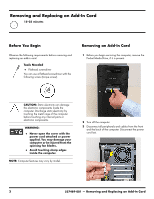
Replacing a Hard Disk Drive
1
Slide the replacement drive into the hard disk drive
cage, with the label facing up and the connectors
toward the right (the top of the cage).
2
Slide the drive into the cage until the four screw holes
in the sides of the drive align with the holes in
the cage.
3
Insert and tighten the four screws that secure the drive
in the cage.
4
Tip up the hard disk drive cage, and locate the four
tabs on the bottom.
IMPORTANT:
The new (replacement) part may not look
the same as the original part, due to different
manufacturers or models. Hewlett-Packard always
provides quality parts that meet or exceed your original
computer specifications.