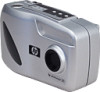
HP Photosmart 318 HP Photosmart 318 Digital Camera - User Guide - Page 41
Using the camera with a Windows NT 4.0 computer, To use an HP printer that has a memory card slot
 |
View all HP Photosmart 318 manuals
Add to My Manuals
Save this manual to your list of manuals |
Page 41 highlights
The status LCD displays PC to indicate the camera is connected to a computer. After a few seconds, the software starts. Follow the instructions on your computer screen to complete the unload process. Note To pause the automatic unload, click anywhere in the HP Automatic Image Unload Software window. If you have no new images in your camera when you connect it to the computer, the automatic unload does not take place. You can set up the HP Automatic Image Unload software so that certain tasks occur automatically after the images are unloaded from the camera. You can: automatically view your images. automatically print your images. automatically lay out a photo album page. To set up the automatic tasks, in the HP Automatic Image Unload Software window, click Task Options. For more information, double-click the HP Quick Reference-Photo Imaging icon that is installed on your desktop with the software. Using the camera with a Windows NT 4.0 computer Windows NT 4.0 does not support the USB interface, so you cannot connect your camera directly to your computer. You can save your images to a CF memory card (purchased separately) and then transfer them from the card to the computer through either a memory card slot in an HP printer equipped with one or through a memory card reader. To use an HP printer that has a memory card slot Follow the instructions in your printer documentation to transfer images from the memory card to your Windows NT 4.0 computer through the printer's memory card slot. Sharing and printing images 33
-
 1
1 -
2
-
3
-
4
-
5
-
6
-
7
-
8
-
9
-
10
-
11
-
12
-
13
-
14
-
15
-
16
-
17
-
18
-
19
-
20
-
21
-
22
-
23
-
24
-
25
-
26
-
27
-
28
-
29
-
30
-
31
-
32
-
33
-
34
-
35
-
 36
36 -
 37
37 -
 38
38 -
 39
39 -
 40
40 -
 41
41 -
 42
42 -
 43
43 -
 44
44 -
 45
45 -
 46
46 -
47
-
48
-
49
-
50
-
51
-
52
-
53
-
54
-
55
-
56
-
57
-
58
-
59
-
60
-
61
-
62
-
63
-
64
-
65
-
66
-
67
-
68
-
69
-
70
-
71
-
72
-
73
-
74
-
75
-
76
-
77
-
78
-
79
-
80
-
81
-
82
-
83
-
84
-
85
-
86
-
87
-
88
 |
 |
