HP Photosmart 7400 HP Photosmart 7400 series Reference Guide - Page 6
Printer screen, Photo cassette, Paper-width guide, Print cartridge storage area, Rear access door - printer cartridges
 |
View all HP Photosmart 7400 manuals
Add to My Manuals
Save this manual to your list of manuals |
Page 6 highlights
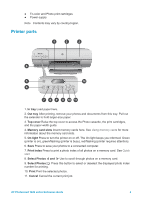
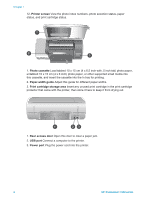
Chapter 1 12. Printer screen View the photo index numbers, photo selection status, paper status, and print cartridge status. 1. Photo cassette Load tabbed 10 x 15 cm (4 x 6.5 inch with .5 inch tab) photo paper, untabbed 10 x 15 cm (4 x 6 inch) photo paper, or other supported small media into this cassette, and insert the cassette into the In tray for printing. 2. Paper-width guide Adjust this guide for different paper widths. 3. Print cartridge storage area Insert any unused print cartridge in the print cartridge protector that came with the printer, then store it here to keep it from drying out. 1. Rear access door Open this door to clear a paper jam. 2. USB port Connect a computer to the printer. 3. Power port Plug the power cord into the printer. 4 HP Photosmart 7400 series
-
 1
1 -
 2
2 -
 3
3 -
 4
4 -
 5
5 -
 6
6 -
 7
7 -
 8
8 -
 9
9 -
 10
10 -
 11
11 -
 12
12 -
13
-
14
-
15
-
16
-
17
-
18
-
19
-
20
-
21
-
22
-
23
-
24
-
25
-
26
-
27
-
28
-
29
-
30
-
31
-
32
 |
 |
