HP Photosmart R707 HP Photosmart R707 digital camera with HP Instant Share - U - Page 49
Noise Reduction for Long Exposures, Using Panorama Mode, Using Your Camera without Installing
 |
View all HP Photosmart R707 manuals
Add to My Manuals
Save this manual to your list of manuals |
Page 49 highlights
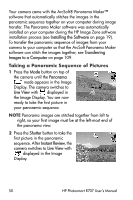
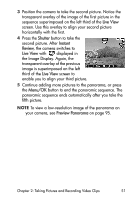
Noise Reduction for Long Exposures At longer shutter speeds the camera will automatically take a second exposure with the shutter closed in order to measure and reduce the noise (grainy look) in the image. In these cases, the exposure will seem to take twice as long as expected. For example, in a 1-second exposure, the Image Display will stay dark for 2 seconds until the noise reduction frame is exposed. This means that at longer shutter speeds, you may not be able to take quite as many shots back-to-back. Using Panorama Mode NOTE If the HP Image Zone software is not installed on your computer, see Using Your Camera without Installing the HP Image Zone Software on page 125. Panorama mode allows you to take a sequence of 2-5 pictures that can be "stitched" together in order to capture a scene too wide to fit into a single picture. In Panorama mode, you take a picture as the first in the panoramic sequence, and each subsequent picture you take is added to the panorama until you end the sequence by pressing the Menu/OK button, or until you have taken the fifth picture in the sequence. You can then view a low-resolution image of your panorama with the Preview Panorama Menu option in the Playback Menu (see page 95), or you can transfer the images in the panoramic sequence to your computer for stitching together and then viewing or printing. Chapter 2: Taking Pictures and Recording Video Clips 49
-
 1
1 -
2
-
3
-
4
-
5
-
6
-
7
-
8
-
9
-
10
-
11
-
12
-
13
-
14
-
15
-
16
-
17
-
18
-
19
-
20
-
21
-
22
-
23
-
24
-
25
-
26
-
27
-
28
-
29
-
30
-
31
-
32
-
33
-
34
-
35
-
36
-
37
-
38
-
39
-
40
-
41
-
42
-
43
-
 44
44 -
 45
45 -
 46
46 -
 47
47 -
 48
48 -
 49
49 -
 50
50 -
 51
51 -
 52
52 -
 53
53 -
 54
54 -
55
-
56
-
57
-
58
-
59
-
60
-
61
-
62
-
63
-
64
-
65
-
66
-
67
-
68
-
69
-
70
-
71
-
72
-
73
-
74
-
75
-
76
-
77
-
78
-
79
-
80
-
81
-
82
-
83
-
84
-
85
-
86
-
87
-
88
-
89
-
90
-
91
-
92
-
93
-
94
-
95
-
96
-
97
-
98
-
99
-
100
-
101
-
102
-
103
-
104
-
105
-
106
-
107
-
108
-
109
-
110
-
111
-
112
-
113
-
114
-
115
-
116
-
117
-
118
-
119
-
120
-
121
-
122
-
123
-
124
-
125
-
126
-
127
-
128
-
129
-
130
-
131
-
132
-
133
-
134
-
135
-
136
-
137
-
138
-
139
-
140
-
141
-
142
-
143
-
144
-
145
-
146
-
147
-
148
-
149
-
150
-
151
-
152
-
153
-
154
-
155
-
156
-
157
-
158
-
159
-
160
-
161
-
162
-
163
-
164
-
165
-
166
-
167
-
168
-
169
-
170
-
171
-
172
-
173
-
174
-
175
-
176
-
177
-
178
-
179
-
180
-
181
-
182
-
183
-
184
-
185
-
186
-
187
-
188
-
189
-
190
-
191
 |
 |