HP Pro 3080 Maintenance & Service Guide: HP Pro 3000/3010/3080 Business PC - Page 134
supply out of the chassis., supply toward the heatsink so it clears the lip at the top of the chassis
 |
View all HP Pro 3080 manuals
Add to My Manuals
Save this manual to your list of manuals |
Page 134 highlights
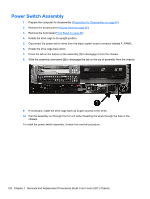
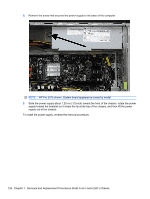
8. Remove the screw that secures the power supply to the base of the computer. NOTE: HP Pro 3015 shown. System board appearance varies by model. 9. Slide the power supply about 1.25 cm (1/2-inch) toward the front of the chassis, rotate the power supply toward the heatsink so it clears the lip at the top of the chassis, and then lift the power supply out of the chassis. To install the power supply, reverse the removal procedure. 124 Chapter 7 Removal and Replacement Procedures Small Form Factor (SFF) Chassis
-
 1
1 -
2
-
3
-
4
-
5
-
6
-
7
-
8
-
9
-
10
-
11
-
12
-
13
-
14
-
15
-
16
-
17
-
18
-
19
-
20
-
21
-
22
-
23
-
24
-
25
-
26
-
27
-
28
-
29
-
30
-
31
-
32
-
33
-
34
-
35
-
36
-
37
-
38
-
39
-
40
-
41
-
42
-
43
-
44
-
45
-
46
-
47
-
48
-
49
-
50
-
51
-
52
-
53
-
54
-
55
-
56
-
57
-
58
-
59
-
60
-
61
-
62
-
63
-
64
-
65
-
66
-
67
-
68
-
69
-
70
-
71
-
72
-
73
-
74
-
75
-
76
-
77
-
78
-
79
-
80
-
81
-
82
-
83
-
84
-
85
-
86
-
87
-
88
-
89
-
90
-
91
-
92
-
93
-
94
-
95
-
96
-
97
-
98
-
99
-
100
-
101
-
102
-
103
-
104
-
105
-
106
-
107
-
108
-
109
-
110
-
111
-
112
-
113
-
114
-
115
-
116
-
117
-
118
-
119
-
120
-
121
-
122
-
123
-
124
-
125
-
126
-
127
-
128
-
 129
129 -
 130
130 -
 131
131 -
 132
132 -
 133
133 -
 134
134 -
 135
135 -
 136
136 -
 137
137 -
 138
138 -
 139
139 -
140
-
141
-
142
-
143
-
144
-
145
-
146
-
147
-
148
-
149
-
150
-
151
-
152
-
153
-
154
-
155
-
156
-
157
-
158
-
159
-
160
-
161
-
162
-
163
-
164
-
165
-
166
-
167
-
168
-
169
-
170
-
171
-
172
-
173
-
174
-
175
-
176
-
177
-
178
-
179
-
180
-
181
-
182
-
183
-
184
-
185
-
186
-
187
-
188
-
189
-
190
-
191
-
192
-
193
-
194
 |
 |
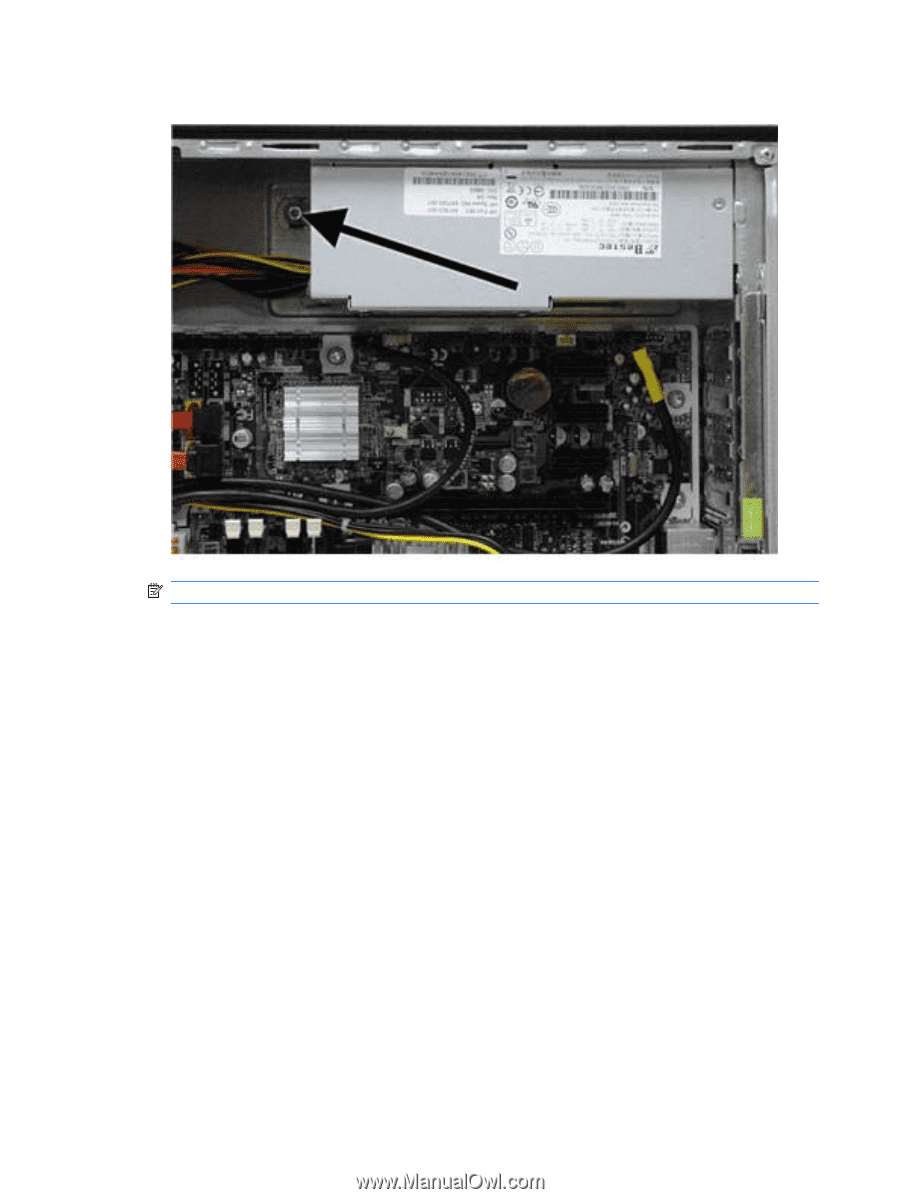
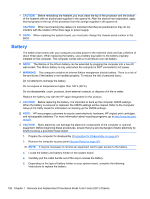
8.
Remove the screw that secures the power supply to the base of the computer.
NOTE:
HP Pro 3015 shown. System board appearance varies by model.
9.
Slide the power supply about 1.25 cm (1/2-inch) toward the front of the chassis, rotate the power
supply toward the heatsink so it clears the lip at the top of the chassis, and then lift the power
supply out of the chassis.
To install the power supply, reverse the removal procedure.
124
Chapter 7
Removal and Replacement Procedures Small Form Factor (SFF) Chassis