HP ProLiant BL280c HP ProLiant BL280c G6 Server Blade User Guide - Page 38
Mezzanine card option - g6 network
 |
View all HP ProLiant BL280c manuals
Add to My Manuals
Save this manual to your list of manuals |
Page 38 highlights
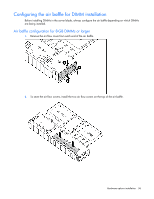
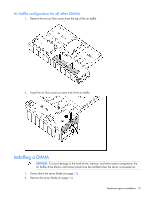
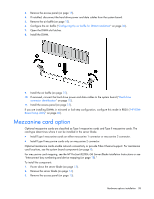
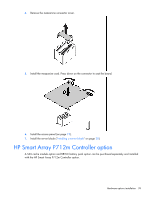
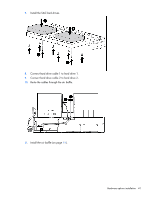
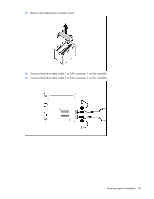
3. Remove the access panel (on page 15). 4. If installed, disconnect the hard drive power and data cables from the system board. 5. Remove the air baffle (on page 15). 6. Configure the air baffle ("Configuring the air baffle for DIMM installation" on page 36). 7. Open the DIMM slot latches. 8. Install the DIMM. 9. Install the air baffle (on page 15). 10. If removed, connect the hard drive power and data cables to the system board ("Hard drive connector identification" on page 10). 11. Install the access panel (on page 15). If you are installing DIMMs in mirrored or lock-step configuration, configure this mode in RBSU ("HP ROMBased Setup Utility" on page 60). Mezzanine card option Optional mezzanine cards are classified as Type I mezzanine cards and Type II mezzanine cards. The card type determines where it can be installed in the server blade. • Install Type I mezzanine cards on either mezzanine 1 connector or mezzanine 2 connector. • Install Type II mezzanine cards only on mezzanine 2 connector. Optional mezzanine cards enable network connectivity or provide Fibre Channel support. For mezzanine card locations, see the system board components (on page 9). For mezzanine card mapping, see the HP ProLiant BL280c G6 Server Blade Installation Instructions or see "Interconnect bay numbering and device mapping (on page 18)." To install the component: 1. Power down the server blade (on page 13). 2. Remove the server blade (on page 14). 3. Remove the access panel (on page 15). Hardware options installation 38
-
 1
1 -
2
-
3
-
4
-
5
-
6
-
7
-
8
-
9
-
10
-
11
-
12
-
13
-
14
-
15
-
16
-
17
-
18
-
19
-
20
-
21
-
22
-
23
-
24
-
25
-
26
-
27
-
28
-
29
-
30
-
31
-
32
-
 33
33 -
 34
34 -
 35
35 -
 36
36 -
 37
37 -
 38
38 -
 39
39 -
 40
40 -
 41
41 -
 42
42 -
 43
43 -
44
-
45
-
46
-
47
-
48
-
49
-
50
-
51
-
52
-
53
-
54
-
55
-
56
-
57
-
58
-
59
-
60
-
61
-
62
-
63
-
64
-
65
-
66
-
67
-
68
-
69
-
70
-
71
-
72
-
73
-
74
-
75
-
76
-
77
-
78
-
79
-
80
-
81
-
82
-
83
-
84
-
85
-
86
-
87
-
88
-
89
-
90
-
91
-
92
-
93
-
94
-
95
-
96
-
97
-
98
-
99
-
100
-
101
-
102
-
103
-
104
-
105
-
106
-
107
-
108
-
109
-
110
-
111
-
112
 |
 |
