HP ProLiant DL170h HP ProLiant DL170h G6 Server Software Configuration Guide - Page 39
Server management, Pre- and post-installation procedures, Configuring the BMC
 |
View all HP ProLiant DL170h manuals
Add to My Manuals
Save this manual to your list of manuals |
Page 39 highlights
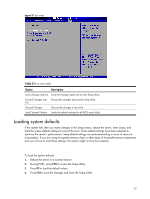
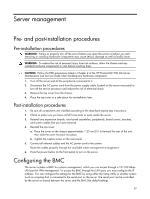
Server management Pre- and post-installation procedures Pre-installation procedures WARNING: Failure to properly turn off the server before you open the server or before you start removing or installing hardware components may cause serious damage as well as bodily harm. WARNING: To reduce the risk of personal injury from hot surfaces, allow the chassis and any installed hardware components to cool before touching them. CAUTION: Follow the ESD precautions listed in Chapter 2 of the HP ProLiant DL170h G6 Server Maintenance and Service Guide when handling any hardware component. 1. Turn off the server and all the peripherals connected to it. 2. Disconnect the AC power cord from the power supply cable located on the server rear panel to turn off the service processor and reduce the risk of electrical shock. 3. Remove the top cover from the chassis. 4. Place the top cover in a safe place for reinstallation later. Post-installation procedures 1. Be sure all components are installed according to the described step-by-step instructions. 2. Check to make sure you have not left loose tools or parts inside the server. 3. Reinstall any expansion boards, riser board assemblies, peripherals, board covers, brackets, and system cables that you have removed. 4. Reinstall the top cover: a. Place the cover on the chassis approximately 1.25 cm (0.5 in) toward the rear of the unit, then slide the cover forward into place. b. Tighten the captive screw on the rear panel. 5. Connect all external cables and the AC power cord to the system. Route the cables properly through the available cable management arrangement. 6. Press the power button on the front panel to turn on the server. Configuring the BMC The server includes a BMC for systems management, which you can access through a 10/100 Mbps LAN port for IPMI management. To access the BMC through this LAN port, you must configure the IP address. You can configure the settings for the BMC by using either the Setup Utility or another system (such as a laptop) that is connected to the serial port on the server. The serial port can be controlled by the server or shared between the server and the BMC (the default setting). 39
-
 1
1 -
2
-
3
-
4
-
5
-
6
-
7
-
8
-
9
-
10
-
11
-
12
-
13
-
14
-
15
-
16
-
17
-
18
-
19
-
20
-
21
-
22
-
23
-
24
-
25
-
26
-
27
-
28
-
29
-
30
-
31
-
32
-
33
-
 34
34 -
 35
35 -
 36
36 -
 37
37 -
 38
38 -
 39
39 -
 40
40 -
 41
41 -
 42
42 -
 43
43
 |
 |