HP Rp2430 rp24xx A180 User Manual - Page 49
A-Class Server Power Up and Boot Procedures, Overview, Power Up Procedures
 |
View all HP Rp2430 manuals
Add to My Manuals
Save this manual to your list of manuals |
Page 49 highlights
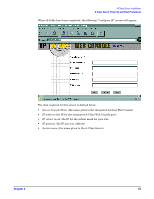
A-Class Server Installation A-Class Server Power Up and Boot Procedures A-Class Server Power Up and Boot Procedures Overview This Section discusses the following power up and boot procedures: • Power Up All External Devices • Power Up the Server • Configuring the integrated A-Class Web Console. This procedure includes: - Configuring The Web Browser Host - Configure the Web Browser - Configure The integrated A-Class Web Console Software - Accessing the Secure Web Console Optional procedures for identifying external devices and mapping diagnostics: • Boot to Initial System Loader (ISL) (Optional) • Run Online Diagnostic Environment (ODE) Mapper (Optional) The command to Boot HP-UX after running either of the preceding options is also included. Power Up Procedures Power Up All External Devices Apply power to all external devices, such as additional disk drives, Universal Power Supply, and Digital Data Storage. Observe that each device passes its own selftest and is ready for operation. Refer to the device-specific documentation as necessary. Power Up the Server Apply power to the A-Class server by toggling the rocker power switch on the rear of the server from the 0 position to the 1 position. All of the front panel LEDs will illuminate for a moment, then turn off. Only the green power LED will remain illuminated until power is switched off. If the LEDs do not illuminate or the server does not appear to power on, refer to Chapter 3, "A-Class System Service," on page 61. The server will automatically conduct a selftest and, upon completion, the firmware Main Menu screen will be displayed at the system console. Only the power LED should be illuminated at this point. If AUTOBOOT is enabled, the system will automatically try to boot HP-UX from the PRIMARY PATH. If you want to interrupt the boot process, press any key on the keyboard within 10 seconds after the message, Hit any key to interrupt the boot sequence is displayed. Chapter 2 49
-
 1
1 -
2
-
3
-
4
-
5
-
6
-
7
-
8
-
9
-
10
-
11
-
12
-
13
-
14
-
15
-
16
-
17
-
18
-
19
-
20
-
21
-
22
-
23
-
24
-
25
-
26
-
27
-
28
-
29
-
30
-
31
-
32
-
33
-
34
-
35
-
36
-
37
-
38
-
39
-
40
-
41
-
42
-
43
-
 44
44 -
 45
45 -
 46
46 -
 47
47 -
 48
48 -
 49
49 -
 50
50 -
 51
51 -
 52
52 -
 53
53 -
 54
54 -
55
-
56
-
57
-
58
-
59
-
60
-
61
-
62
-
63
-
64
-
65
-
66
-
67
-
68
-
69
-
70
-
71
-
72
-
73
-
74
-
75
-
76
-
77
-
78
-
79
-
80
-
81
-
82
-
83
-
84
-
85
-
86
-
87
-
88
-
89
-
90
-
91
-
92
-
93
-
94
-
95
-
96
-
97
-
98
-
99
-
100
-
101
-
102
-
103
-
104
-
105
-
106
 |
 |
