HP Rp3000 Service Reference Guide: HP rp3000 Point of Sale - Page 125
Solving Optical Drive Problems
 |
UPC - 884420494096
View all HP Rp3000 manuals
Add to My Manuals
Save this manual to your list of manuals |
Page 125 highlights
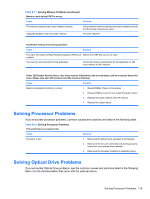
Table D-13 Solving Optical Drive Problems (continued) Movie will not play in the DVD drive. Cause Solution Movie rating locked out by parental lock. Use DVD software to remove parental lock. Media installed upside down. Reinstall media. CD-ROM, CD-RW, DVD-ROM, or DVD-R/RW drive cannot read a disc or takes too long to start. Cause Solution Media has been inserted upside down. Re-insert the Media with the label facing up. The DVD-ROM drive takes longer to start because it has to determine the type of media played, such as audio or video. Wait at least 30 seconds to let the DVD-ROM drive determine the type of media being played. If the disc still does not start, read the other solutions listed for this topic. CD or DVD disc is dirty. Clean CD or DVD with a CD cleaning kit, available from most computer stores. Windows does not detect the CD-ROM or DVD-ROM drive. 1. Use Device Manager to remove or uninstall the device. 2. Restart the computer and let Windows detect the CD or DVD driver. Recording or copying CDs is difficult or impossible. Cause Wrong or poor quality media type. Solution 1. Try using a slower speed when recording. 2. Verify that you are using the correct media for the drive. 3. Try a different brand of media. Quality varies widely between manufacturers. Computer boots too slow after removing an optical drive. Cause Solution The system is searching for the drive during boot because the Disconnect the drive cable from the system board. drive cable is still attached to the system board. DVD or CD in the optical drive will not eject. Cause The sliding door that covers the optical drive is closed. Disc not properly seated in the drive. Solution Use the key provided to unlock the door (if necessary) and slide the door all the way down. Turn off the computer and insert a thin metal rod into the emergency eject hole and push firmly. Slowly pull the tray out from the drive until the tray is fully extended, then remove the disc. Solving Optical Drive Problems 117
-
 1
1 -
2
-
3
-
4
-
5
-
6
-
7
-
8
-
9
-
10
-
11
-
12
-
13
-
14
-
15
-
16
-
17
-
18
-
19
-
20
-
21
-
22
-
23
-
24
-
25
-
26
-
27
-
28
-
29
-
30
-
31
-
32
-
33
-
34
-
35
-
36
-
37
-
38
-
39
-
40
-
41
-
42
-
43
-
44
-
45
-
46
-
47
-
48
-
49
-
50
-
51
-
52
-
53
-
54
-
55
-
56
-
57
-
58
-
59
-
60
-
61
-
62
-
63
-
64
-
65
-
66
-
67
-
68
-
69
-
70
-
71
-
72
-
73
-
74
-
75
-
76
-
77
-
78
-
79
-
80
-
81
-
82
-
83
-
84
-
85
-
86
-
87
-
88
-
89
-
90
-
91
-
92
-
93
-
94
-
95
-
96
-
97
-
98
-
99
-
100
-
101
-
102
-
103
-
104
-
105
-
106
-
107
-
108
-
109
-
110
-
111
-
112
-
113
-
114
-
115
-
116
-
117
-
118
-
119
-
 120
120 -
 121
121 -
 122
122 -
 123
123 -
 124
124 -
 125
125 -
 126
126 -
 127
127 -
 128
128 -
 129
129 -
 130
130 -
131
-
132
-
133
-
134
 |
 |
