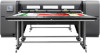
HP Scitex FB750 User Guide - Page 15
Performance and ease-of-use, Use the HP Embedded Web Server, Display the printer status
 |
View all HP Scitex FB750 manuals
Add to My Manuals
Save this manual to your list of manuals |
Page 15 highlights
Performance and ease-of-use ● Media Wizard - Stores and recalls a set of operating parameters by media type and print mode, for optimal printing performance. Includes a set of predefined settings for standard media. You can also create and save custom settings for other media. ● Edge-to-edge printing - Provides the look of "full bleed" prints without trimming. ● Stored jobs - Stores print jobs on the printer's internal hard disk drive for subsequent reprinting without having to resend it from the RIP. ● Simplified control panel interface - Touch-screen control panel with graphical interface presents frequently-used functions. A menu provides access to less-frequently used functions and troubleshooting help. ● User assistance - Control panel features online help, interactive procedures, scheduled cleaning reminders, and diagnostics to assist the user, reducing training and troubleshooting time. ● HP Embedded Web Server - By entering the printer's IP address into the address bar of any web browser on your local area network, you can view printer status, change certain settings, upgrade the printer firmware, and download system log files. Use the HP Embedded Web Server When the printer is connected to your local area network (LAN), you can enter the printer's IP address into the address bar of your web browser to display printer status, set the internal date and time of the printer, download a log file, update the printer firmware, and transfer a custom Media Wizard definition. Connect to the HP Embedded Web Server To connect to the Embedded Web Server, open a web browser on any computer connected to the same network as the printer, and enter the printer's IP address into the browser (http://[ip-address]). The printer's IP address is displayed on the System screen of the printer's control panel. When the browser connects to the printer, the Embedded Web Server displays its home page. Display the printer status To display the printer status, including media type loaded and amount of ink remaining, select the printer status option from the Embedded Web Server menu. Display the current control panel image To display an image of the screen that is currently displayed on the control panel, select the option from the Embedded Web Server menu. Set the date and time To set the printer date and time, select this option from the Embedded Web Server menu. Enter the current date and time as specified on this screen, and click the Set Time button. NOTE: To ensure the proper scheduling of automatic maintenance operations and times and dates in event logs, verify the correct local time on the printer, and adjust as needed for daylight savings time changes if observed at your location. 8 Chapter 1 Introduction ENWW
-
 1
1 -
2
-
3
-
4
-
5
-
6
-
7
-
8
-
9
-
 10
10 -
 11
11 -
 12
12 -
 13
13 -
 14
14 -
 15
15 -
 16
16 -
 17
17 -
 18
18 -
 19
19 -
 20
20 -
21
-
22
-
23
-
24
-
25
-
26
-
27
-
28
-
29
-
30
-
31
-
32
-
33
-
34
-
35
-
36
-
37
-
38
-
39
-
40
-
41
-
42
-
43
-
44
-
45
-
46
-
47
-
48
-
49
-
50
-
51
-
52
-
53
-
54
-
55
-
56
-
57
-
58
-
59
-
60
-
61
-
62
-
63
-
64
-
65
-
66
-
67
-
68
-
69
-
70
-
71
-
72
-
73
-
74
-
75
-
76
-
77
-
78
-
79
-
80
-
81
-
82
-
83
-
84
-
85
-
86
-
87
-
88
-
89
-
90
-
91
-
92
-
93
-
94
-
95
-
96
-
97
-
98
-
99
-
100
-
101
-
102
-
103
-
104
-
105
-
106
-
107
-
108
-
109
-
110
-
111
-
112
-
113
-
114
-
115
-
116
-
117
-
118
-
119
-
120
-
121
-
122
-
123
-
124
-
125
 |
 |
