HP Server tc3100 HP Surestore Drive Rail Mounting Kit Information - Page 4
HP Part Number 5990-3463, Installing the Metal Drive Rails All Other Drive Models - server specifications
 |
View all HP Server tc3100 manuals
Add to My Manuals
Save this manual to your list of manuals |
Page 4 highlights
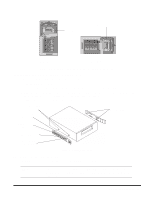
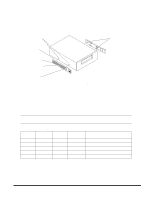
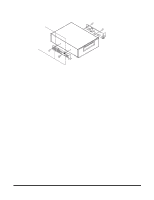
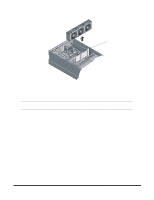
1. Insert one end of the wire rod on the rail into the mounting hole at the rear of the drive (Figure 4). 2. Apply pressure to the middle of the rail allowing the remaining wire rod end to be inserted into the mounting hole at the front of the drive. Ensure that the rail is seated against the side of the drive. 3. Repeat the installation for the second mounting rail. Mounting Holes Insert this wire rod end first Apply pressure to middle of rail Wire Rod Wire Rod Ends Insert this wire rod end last Figure 4. Plastic Drive Rails Installing the Metal Drive Rails (All Other Drive Models) Table 3. lists the mounting slot and sub-kit screws required for attaching the metal rails to each HP Surestore tape drive. See Figure 5 for the mounting slot location. To install the metal drive rails: 1. Align the drive rail over the tape drive screw holes. 2. Secure the drive rail with the appropriate screws for the tape drive (see Table 3.). NOTE Do not over-torque the mounting screws. Too much torque can damage the threading on the rails. Table 3. Metal Drive Rail Mounting Slot and Screw Specification Drive Mounting Part Number Slot DAT 40x6i C5716A 1 Ultrium 230i C7400A 1 Ultrium 215i C7420A 2 DAT 24X6i C5677B 1 DLT VS80i C7504A 1 Screw Kit Part Number Q1497-60005 Q1497-60005 Q1497-60007 Q1497-60005 Q1497-60006 Screw Specification M3 x 6mm countersunk, TORX M3 x 6mm countersunk, TORX M3 x 4mm pan head + washer Posidrive M3 x 6mm countersunk, TORX #6-32 x 0.25in countersunk, Phillips 3. Repeat the installation for the second drive rail. 4. Insert the tape drive into the server and secure with chassis screws Q1497-60008. 4 HP Part Number 5990-3463
-
 1
1 -
 2
2 -
 3
3 -
 4
4 -
 5
5 -
 6
6 -
 7
7 -
 8
8
 |
 |
