HP Sprocket Studio App User Guide - Page 4
Using the Main Menu, Printer Settings: sprocket Menu, App Settings Menu, Image Preview, Edit - photo paper
 |
View all HP Sprocket Studio manuals
Add to My Manuals
Save this manual to your list of manuals |
Page 4 highlights
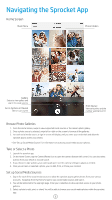
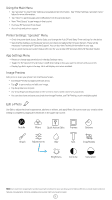
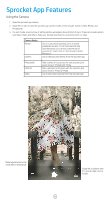
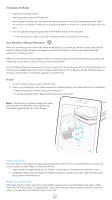
Using the Main Menu • Tap "sprocket" to view Printer Settings and paired printer information. See "Printer Settings: 'sprocket' menu" below for more information. • Tap "Inbox" to get messages and notifications from the sprocket team • View "Print Queue" to see images in line to print • Purchase HP Sprocket Photo Paper • Access help and printer support Printer Settings: "sprocket" Menu • Check the power bank status, Device State, and change the Auto Off and Sleep Timer settings for the device. • View the Mac Address and Hardware Version and check and update the Firmware Version. These will be necessary if contacting HP Sprocket Support. You can also view Technical Information in your app. • Set a custom name and custom Status LED color for your printer (HP Sprocket 200 & HP Sprocket Studio) App Settings Menu • Review or change app permissions in the App Settings menu. • Toggle the HP Sprocket Reveal feature on/off, depending on how you want to interact with your prints. • Display App Hints again in the app. Hints will display once when enabled. Image Preview Edit, print, or share your photo from the Preview Screen. • Exit Image Preview by tapping the back arrow. • Tap to personalize and edit your image. • Tap the printer icon to print. • Use a two finger pinching motion on the screen to zoom, rotate, and resize your photo. • You can also share and save your photo from Image Preview, use Tile Printing, or print multiple copies! Edit a Photo Use Edit to adjust the photo's appearance, add text or stickers, and apply filters. Be sure to save your creation when editing is complete by tapping the checkmark in the upper right corner. Autofix Filters Quick Action Edits Frames Stickers Brush Adjustments Blur Text Crop/Rotate Brightness Contrast Saturation Note: User experience navigating the sprocket app might vary based on your operating system. Stylistic differences provide slight variation in features and experience. Similarly, available social sources might vary based on region. 3
-
 1
1 -
 2
2 -
 3
3 -
 4
4 -
 5
5 -
 6
6 -
 7
7 -
 8
8 -
 9
9 -
 10
10
 |
 |