HP StorageWorks 2/128 Brocade Fabric Manager Administrator's Guide (53-1000019 - Page 100
Editing a Switch Group
 |
View all HP StorageWorks 2/128 manuals
Add to My Manuals
Save this manual to your list of manuals |
Page 100 highlights
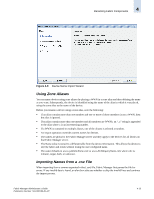
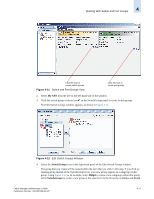
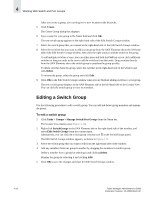
4 Working With Switch and Port Groups After you create a group, you can drag it to a new location in the hierarchy. 5. Click Create. The Create Group dialog box displays. 6. Type a name for your group in the Name field and click OK. The new switch group appears in the right-hand side of the Edit Switch Groups window. 7. Select the switch group that you created in the right-hand side of the Edit Switch Groups window. 8. Select the switches that you want to add to your group from the SAN Elements tab on the left-hand side of the Edit Switch Groups window; then click the right-arrow to add the switch to the group. To add multiple switches at once, you can either press and hold the Ctrl key as you click additional switches or drag any node in the tree to add the switches from that node. Drag switches directly from the SAN Elements tab to the switch group to populate the group quickly. To delete switches from the group, select the switches in the right-hand side of the window and click Delete. To rename the group, select the group and click Edit. 9. Click OK in the Edit Switch Groups window when you are finished adding switches to your group. The new switch group displays in the SAN Elements tab on the left-hand side of the Groups View. You can click the switch group to view its members. Editing a Switch Group Use the following procedure to edit a switch group. You can add and delete group members and rename the group. To edit a switch group 1. Click Tasks > Groups > Manage Switch/Port Groups from the Menu bar. The Groups View displays (see Figure 4-11). 2. Right-click SwitchGroups in the SAN Elements tab on the right-hand side of the window, and select Edit Switch Groups from the context menu. Alternatively, you can click the switch group creation icon in the SwitchGroups panel. The Edit Switch Groups window appears, as shown in Figure 4-12. 3. Select the switch group that you want to edit from the right-hand side of the window. 4. Add any members from one group to another by dragging the members to another group. Delete a member from a group by selecting it and clicking Delete. Rename the group by selecting it and clicking Edit. 5. Click OK to save the changes and close the Edit Switch Groups window. 4-18 Fabric Manager Administrator's Guide Publication Number: 53-1000196-01-HP
-
 1
1 -
2
-
3
-
4
-
5
-
6
-
7
-
8
-
9
-
10
-
11
-
12
-
13
-
14
-
15
-
16
-
17
-
18
-
19
-
20
-
21
-
22
-
23
-
24
-
25
-
26
-
27
-
28
-
29
-
30
-
31
-
32
-
33
-
34
-
35
-
36
-
37
-
38
-
39
-
40
-
41
-
42
-
43
-
44
-
45
-
46
-
47
-
48
-
49
-
50
-
51
-
52
-
53
-
54
-
55
-
56
-
57
-
58
-
59
-
60
-
61
-
62
-
63
-
64
-
65
-
66
-
67
-
68
-
69
-
70
-
71
-
72
-
73
-
74
-
75
-
76
-
77
-
78
-
79
-
80
-
81
-
82
-
83
-
84
-
85
-
86
-
87
-
88
-
89
-
90
-
91
-
92
-
93
-
94
-
 95
95 -
 96
96 -
 97
97 -
 98
98 -
 99
99 -
 100
100 -
 101
101 -
 102
102 -
 103
103 -
 104
104 -
 105
105 -
106
-
107
-
108
-
109
-
110
-
111
-
112
-
113
-
114
-
115
-
116
-
117
-
118
-
119
-
120
-
121
-
122
-
123
-
124
-
125
-
126
-
127
-
128
-
129
-
130
-
131
-
132
-
133
-
134
-
135
-
136
-
137
-
138
-
139
-
140
-
141
-
142
-
143
-
144
-
145
-
146
-
147
-
148
-
149
-
150
-
151
-
152
-
153
-
154
-
155
-
156
-
157
-
158
-
159
-
160
-
161
-
162
-
163
-
164
-
165
-
166
-
167
-
168
-
169
-
170
-
171
-
172
-
173
-
174
-
175
-
176
-
177
-
178
-
179
-
180
-
181
-
182
-
183
-
184
-
185
-
186
-
187
-
188
-
189
-
190
-
191
-
192
-
193
-
194
-
195
-
196
-
197
-
198
-
199
-
200
-
201
-
202
-
203
-
204
-
205
-
206
-
207
-
208
-
209
-
210
-
211
-
212
-
213
-
214
-
215
-
216
-
217
-
218
-
219
-
220
-
221
-
222
-
223
-
224
-
225
-
226
-
227
-
228
-
229
-
230
-
231
-
232
-
233
-
234
-
235
-
236
-
237
-
238
-
239
-
240
-
241
-
242
-
243
-
244
-
245
-
246
-
247
-
248
-
249
-
250
-
251
-
252
-
253
-
254
-
255
-
256
-
257
-
258
-
259
-
260
-
261
-
262
-
263
-
264
-
265
-
266
-
267
-
268
-
269
-
270
-
271
-
272
-
273
-
274
-
275
-
276
-
277
-
278
-
279
-
280
-
281
-
282
-
283
-
284
-
285
-
286
-
287
-
288
-
289
-
290
-
291
-
292
-
293
-
294
-
295
-
296
-
297
-
298
-
299
-
300
-
301
-
302
-
303
-
304
-
305
-
306
-
307
-
308
-
309
-
310
-
311
-
312
-
313
-
314
-
315
-
316
-
317
-
318
-
319
-
320
-
321
-
322
-
323
-
324
-
325
-
326
-
327
-
328
-
329
-
330
-
331
-
332
-
333
-
334
-
335
-
336
-
337
-
338
-
339
-
340
-
341
-
342
-
343
-
344
-
345
-
346
-
347
-
348
-
349
-
350
-
351
-
352
-
353
-
354
-
355
-
356
-
357
-
358
-
359
-
360
-
361
-
362
-
363
-
364
-
365
-
366
-
367
-
368
-
369
-
370
-
371
-
372
-
373
-
374
-
375
-
376
-
377
-
378
-
379
-
380
-
381
-
382
-
383
-
384
-
385
-
386
-
387
-
388
-
389
-
390
-
391
-
392
-
393
-
394
-
395
-
396
-
397
-
398
-
399
-
400
-
401
-
402
-
403
-
404
-
405
-
406
 |
 |