HP StorageWorks 2/128 Brocade Fabric Manager Administrator's Guide (53-1000019 - Page 269
Configuring No-Node WWN Zoning, Adding a Switch to a Secure Fabric
 |
View all HP StorageWorks 2/128 manuals
Add to My Manuals
Save this manual to your list of manuals |
Page 269 highlights
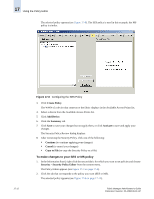
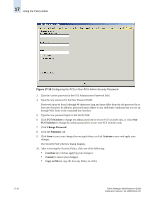
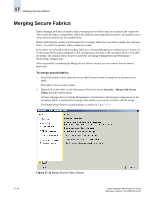
Adding a Switch to a Secure Fabric 17 Configuring No-Node WWN Zoning Fabric Manager allows you to enable or disable No-Node WWN Zoning. When you enable this feature, security becomes port-oriented. Devices have port and node WWNs. When you disable node zoning, you ensure that devices with multiple ports cannot access secure fabrics with node WWNs. You must add individual port WWNs to your policies for devices to access your secure fabric. To configure No-Node WWN Zoning 1. In the Information Panel, right-click the secure fabric for which you want to set policies and choose Security > Security Policy Editor from the context menu. The Policy Editor appears (see Figure 17-3 on page 17-4). 2. Click the Options tab. 3. To enable No Node WWN Zoning, check the No Node WWN Zoning checkbox; to disable, uncheck the No Node WWN Zoning checkbox. 4. Click the Summary tab. 5. Click Save to save your changes but not apply them, or click Activate to save and apply your changes. The Security Policy Review dialog displays. 6. After reviewing the Security Policy, click one of the following: • Continue (to continue applying your changes) • Cancel (to cancel your changes) • Copy to File (to copy the Security Policy to a file) Adding a Switch to a Secure Fabric If you attempt to add a new switch to a secure fabric the same way you would add it to a non-secure fabric, the switch is rejected and segmented into its own fabric. For the switch to be added successfully, secure mode must first be enabled on the switch and then two secure fabrics must be merged together. For instructions on adding a switch to the SCC policy, see "Configuring SCC Policy Options" on page 17-6. To add a switch to a secure fabric 1. Enable secure mode on a single switch in a nonsecure fabric (see "Enabling Secure Mode" on page 17-1). 2. Merge the two secure fabrics into one fabric using the secure fabric wizard (see "Merging Secure Fabrics" on page 17-18). Fabric Manager Administrator's Guide Publication Number: 53-1000196-01-HP 17-17
-
 1
1 -
2
-
3
-
4
-
5
-
6
-
7
-
8
-
9
-
10
-
11
-
12
-
13
-
14
-
15
-
16
-
17
-
18
-
19
-
20
-
21
-
22
-
23
-
24
-
25
-
26
-
27
-
28
-
29
-
30
-
31
-
32
-
33
-
34
-
35
-
36
-
37
-
38
-
39
-
40
-
41
-
42
-
43
-
44
-
45
-
46
-
47
-
48
-
49
-
50
-
51
-
52
-
53
-
54
-
55
-
56
-
57
-
58
-
59
-
60
-
61
-
62
-
63
-
64
-
65
-
66
-
67
-
68
-
69
-
70
-
71
-
72
-
73
-
74
-
75
-
76
-
77
-
78
-
79
-
80
-
81
-
82
-
83
-
84
-
85
-
86
-
87
-
88
-
89
-
90
-
91
-
92
-
93
-
94
-
95
-
96
-
97
-
98
-
99
-
100
-
101
-
102
-
103
-
104
-
105
-
106
-
107
-
108
-
109
-
110
-
111
-
112
-
113
-
114
-
115
-
116
-
117
-
118
-
119
-
120
-
121
-
122
-
123
-
124
-
125
-
126
-
127
-
128
-
129
-
130
-
131
-
132
-
133
-
134
-
135
-
136
-
137
-
138
-
139
-
140
-
141
-
142
-
143
-
144
-
145
-
146
-
147
-
148
-
149
-
150
-
151
-
152
-
153
-
154
-
155
-
156
-
157
-
158
-
159
-
160
-
161
-
162
-
163
-
164
-
165
-
166
-
167
-
168
-
169
-
170
-
171
-
172
-
173
-
174
-
175
-
176
-
177
-
178
-
179
-
180
-
181
-
182
-
183
-
184
-
185
-
186
-
187
-
188
-
189
-
190
-
191
-
192
-
193
-
194
-
195
-
196
-
197
-
198
-
199
-
200
-
201
-
202
-
203
-
204
-
205
-
206
-
207
-
208
-
209
-
210
-
211
-
212
-
213
-
214
-
215
-
216
-
217
-
218
-
219
-
220
-
221
-
222
-
223
-
224
-
225
-
226
-
227
-
228
-
229
-
230
-
231
-
232
-
233
-
234
-
235
-
236
-
237
-
238
-
239
-
240
-
241
-
242
-
243
-
244
-
245
-
246
-
247
-
248
-
249
-
250
-
251
-
252
-
253
-
254
-
255
-
256
-
257
-
258
-
259
-
260
-
261
-
262
-
263
-
 264
264 -
 265
265 -
 266
266 -
 267
267 -
 268
268 -
 269
269 -
 270
270 -
 271
271 -
 272
272 -
 273
273 -
 274
274 -
275
-
276
-
277
-
278
-
279
-
280
-
281
-
282
-
283
-
284
-
285
-
286
-
287
-
288
-
289
-
290
-
291
-
292
-
293
-
294
-
295
-
296
-
297
-
298
-
299
-
300
-
301
-
302
-
303
-
304
-
305
-
306
-
307
-
308
-
309
-
310
-
311
-
312
-
313
-
314
-
315
-
316
-
317
-
318
-
319
-
320
-
321
-
322
-
323
-
324
-
325
-
326
-
327
-
328
-
329
-
330
-
331
-
332
-
333
-
334
-
335
-
336
-
337
-
338
-
339
-
340
-
341
-
342
-
343
-
344
-
345
-
346
-
347
-
348
-
349
-
350
-
351
-
352
-
353
-
354
-
355
-
356
-
357
-
358
-
359
-
360
-
361
-
362
-
363
-
364
-
365
-
366
-
367
-
368
-
369
-
370
-
371
-
372
-
373
-
374
-
375
-
376
-
377
-
378
-
379
-
380
-
381
-
382
-
383
-
384
-
385
-
386
-
387
-
388
-
389
-
390
-
391
-
392
-
393
-
394
-
395
-
396
-
397
-
398
-
399
-
400
-
401
-
402
-
403
-
404
-
405
-
406
 |
 |