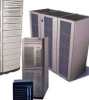
HP Surestore Disk Array 12h Controller Module Installation Guide - Page 2
Installing Controller Batteries
 |
View all HP Surestore Disk Array 12h manuals
Add to My Manuals
Save this manual to your list of manuals |
Page 2 highlights
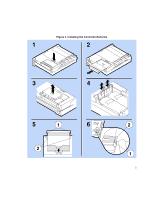
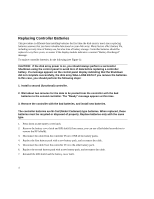
Installing Controller Batteries Two battery packs, part number 1420-0532, must be installed in each controller module before the module can be used. Two battery packs are shipped with each new controller module. In the disk array shipping carton, the batteries are located in a cardboard sleeve next to the array controller. To install the controller battery packs, do the following (see Figure 1): 1. If the battery cover latch is not already removed, press down on the battery cover latch. 2. If the battery cover latch is not already removed, remove the battery cover latch and then remove the RFI shield (if necessary, you can use a flat-bladed screwdriver to remove the RFI shield). 3. Install both battery packs, and connect the cables as shown. 4. Reinstall the RFI shield and the battery cover latch. CAUTION! Make sure you reinstall the battery cover latch carefully, so each of the locking tabs (see Figure 1, View 5, Items 1 and 2) slide beneath the battery compartment. If the battery cover latch is not secured properly, it could prevent the removal of the controller module once it is installed in the disk array enclosure. After new battery packs are installed, and the array controllers are installed and powered on, about one minute is required before the "Battery Discharged" message on the control panel disappears. About twelve hours are required to fully charge new battery packs. During this time, a "Battery Charging" message will be displayed on the control panel. 2
-
 1
1 -
 2
2 -
 3
3 -
 4
4 -
 5
5 -
 6
6 -
 7
7 -
 8
8 -
9
-
10
-
11
-
12
-
13
-
14
-
15
-
16
-
17
-
18
-
19
-
20
-
21
-
22
-
23
-
24
-
25
-
26
-
27
-
28
-
29
-
30
-
31
-
32
-
33
-
34
-
35
 |
 |
