HP T5125 Hardware Reference Guide HP Compaq t5000 Thin Client - Page 17
Flash Memory
 |
UPC - 082960980097
View all HP T5125 manuals
Add to My Manuals
Save this manual to your list of manuals |
Page 17 highlights
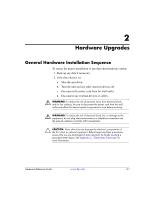
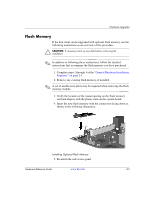
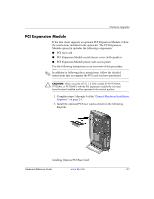
Hardware Upgrades Flash Memory If the thin client can be upgraded with optional flash memory, use the following instructions as an overview of this procedure. Ä CAUTION: If necessary, back up any data before continuing the installation. ✎ In addition to following these instructions, follow the detailed instructions that accompany the flash memory you have purchased. 1. Complete steps 1 through 4 of the "General Hardware Installation Sequence" on page 2-1. 2. Remove any existing flash memory, if installed. ✎ A set of needle-nose pliers may be required when removing the flash memory module. 3. Verify the location of the round opening on the flash memory card and align it with the plastic stem on the system board. 4. Insert the new flash memory with the connectors facing down as shown in the following illustration. Installing Optional Flash Memory 5. Re-attach the side access panel. Hardware Reference Guide www.hp.com 2-5
-
 1
1 -
2
-
3
-
4
-
5
-
6
-
7
-
8
-
9
-
10
-
11
-
 12
12 -
 13
13 -
 14
14 -
 15
15 -
 16
16 -
 17
17 -
 18
18 -
 19
19 -
 20
20 -
 21
21 -
 22
22 -
23
-
24
-
25
-
26
-
27
-
28
-
29
-
30
-
31
-
32
 |
 |