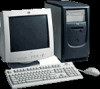
HP Vectra XE320 hp vectra xe320, upgrade guide - Page 12
Removing and Replacing the Side Panel
 |
View all HP Vectra XE320 manuals
Add to My Manuals
Save this manual to your list of manuals |
Page 12 highlights
Upgrading and Replacing PC Hardware Removing and Replacing the Side Panel WARNING For your safety, disconnect the power cord and all external cables. 1 Place the PC on a flat surface and stand behind it. 2 Disconnect all cables from the rear of the PC. 3 Undo the two thumb screws on the back of the PC then slide back and lift off the side panel. Thumbscrews 4 Reverse the process described in Steps 2 to 3 to replace the side panel. 12
-
 1
1 -
2
-
3
-
4
-
5
-
6
-
 7
7 -
 8
8 -
 9
9 -
 10
10 -
 11
11 -
 12
12 -
 13
13 -
 14
14 -
 15
15 -
 16
16 -
 17
17 -
18
-
19
-
20
-
21
-
22
-
23
-
24
-
25
-
26
-
27
-
28
 |
 |

Upgrading and Replacing PC Hardware
12
Removing and Replacing the Side Panel
WARNING
For your safety, disconnect the power cord and all external cables.
1
Place the PC on a flat surface and stand behind it.
2
Disconnect all cables from the rear of the PC.
3
Undo the two thumb screws on the back of the PC then slide back and lift off the side panel.
4
Reverse the process described in Steps 2 to 3 to replace the side panel.
Thumbscrews