HP W1907 HP w19 LCD Monitor User's Guide - Page 8
Attaching the Cables: HP w19 LCD Monitor, Cable Connections On Back of Monitor and Computer
 |
UPC - 882780774636
View all HP W1907 manuals
Add to My Manuals
Save this manual to your list of manuals |
Page 8 highlights
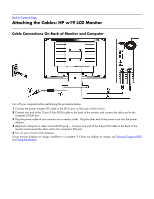
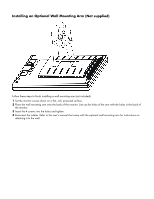
Back to Contents Page Attaching the Cables: HP w19 LCD Monitor Cable Connections On Back of Monitor and Computer Turn off your computer before performing the procedure below. 1 Connect the power adapter DC cable to the DC-In port on the back of the monitor. 2 Connect one end of the 15-pin D-Sub (VGA) cable to the back of the monitor and connect the other end to the computer's D-Sub port. 3 Plug the power cable of your monitor into a nearby outlet. Plug the other end of the power cord into the power adapter. 4 (Optional - Requires a video card with DVI port) - Connect one end of the 24-pin DVI cable to the back of the monitor and connect the other end to the computer's DVI port. 5 Turn on your monitor and computer. If your monitor displays an image, installation is complete. If it does not display an image, see Technical Support FAQ and Using the Monitor.
-
 1
1 -
2
-
 3
3 -
 4
4 -
 5
5 -
 6
6 -
 7
7 -
 8
8 -
 9
9 -
 10
10 -
 11
11 -
 12
12 -
 13
13 -
14
-
15
-
16
-
17
-
18
-
19
-
20
-
21
-
22
 |
 |
