HP Workstation x2100 hp workstation x2100 - Technical reference manual - Page 131
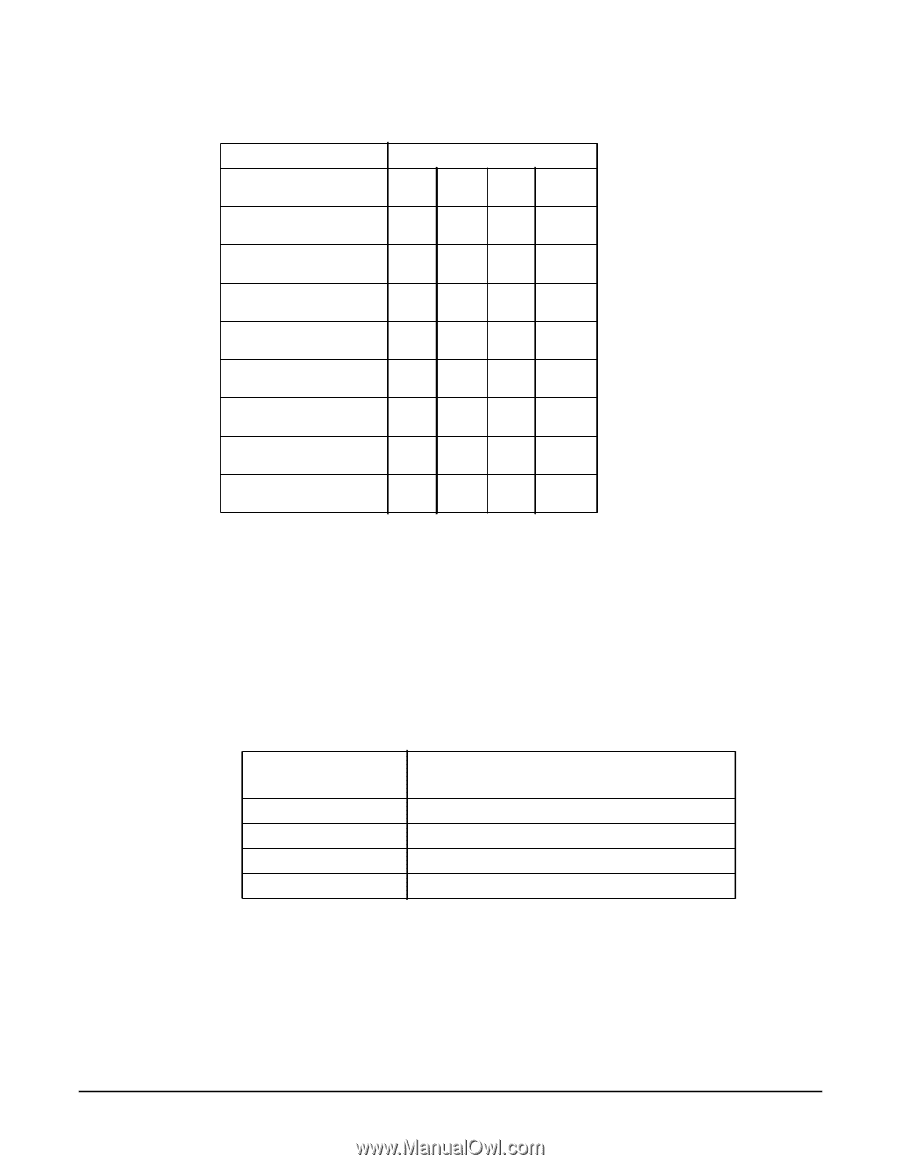
Verifying Your SCSI Drive, <TABLE>, additional guide rails, Table 6-2, Pins to Jumper Continued
 |
View all HP Workstation x2100 manuals
Add to My Manuals
Save this manual to your list of manuals |
Page 131 highlights
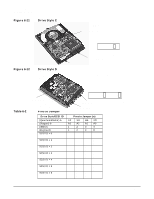
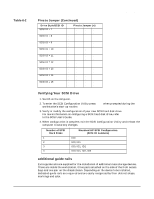
Table 6-2 Chapter 6 Installing Or Replacing Parts And Accessories Installing SCSI Drives Pins to Jumper (Continued) Drive Style/SCSI ID SCSI ID = 7 SCSI ID = 8 SCSI ID = 9 SCSI ID = 10 SCSI ID = 11 SCSI ID = 12 SCSI ID = 13 SCSI ID = 14 SCSI ID = 15 Pins to Jumper (n) Ë s s s Ë s s s s Ë Ë Ë s Ë Ë Ë s Ë Ë s s Ë Ë s s Ë s Ë s Ë s Ë s Ë s s s Ë s s s s Ë Ë s s Ë Ë s s Ë s s s Ë s s s s Ë s s s Ë s s s s s s s s Verifying Your SCSI Drive 1. Switch on the computer. 2. To enter the SCSI Configuration Utility press Ctrl-C when prompted during the workstation's start-up routine. 3. Verify or modify the configuration of your new SCSI hard disk drive. For more information on configuring a SCSI hard disk drive, refer to the SCSI User's Guide. 4. When configuration is complete, exit the SCSI Configuration Utility and re-boot the computer to save any changes. Number of SCSI Hard Disks 1 2 3 4 Standard HP SCSI Configuration (SCSI ID numbers) ID0 ID0, ID1 ID0, ID1, ID2 ID0, ID1, ID2, ID3 additional guide rails Extra guide rails are supplied for the installation of additional mass storage devices. These are inside the workstation, three pairs attached on the side of the front access bays and one pair on the chassis beam. Depending on the device to be installed, dedicated guide rails are required and are easily recognized by their distinct shape, markings and color. 131
-
 1
1 -
2
-
3
-
4
-
5
-
6
-
7
-
8
-
9
-
10
-
11
-
12
-
13
-
14
-
15
-
16
-
17
-
18
-
19
-
20
-
21
-
22
-
23
-
24
-
25
-
26
-
27
-
28
-
29
-
30
-
31
-
32
-
33
-
34
-
35
-
36
-
37
-
38
-
39
-
40
-
41
-
42
-
43
-
44
-
45
-
46
-
47
-
48
-
49
-
50
-
51
-
52
-
53
-
54
-
55
-
56
-
57
-
58
-
59
-
60
-
61
-
62
-
63
-
64
-
65
-
66
-
67
-
68
-
69
-
70
-
71
-
72
-
73
-
74
-
75
-
76
-
77
-
78
-
79
-
80
-
81
-
82
-
83
-
84
-
85
-
86
-
87
-
88
-
89
-
90
-
91
-
92
-
93
-
94
-
95
-
96
-
97
-
98
-
99
-
100
-
101
-
102
-
103
-
104
-
105
-
106
-
107
-
108
-
109
-
110
-
111
-
112
-
113
-
114
-
115
-
116
-
117
-
118
-
119
-
120
-
121
-
122
-
123
-
124
-
125
-
 126
126 -
 127
127 -
 128
128 -
 129
129 -
 130
130 -
 131
131 -
 132
132 -
 133
133 -
 134
134 -
 135
135 -
 136
136 -
137
-
138
-
139
-
140
-
141
-
142
-
143
-
144
-
145
-
146
-
147
-
148
-
149
-
150
-
151
-
152
-
153
-
154
-
155
-
156
-
157
-
158
-
159
-
160
-
161
-
162
-
163
-
164
-
165
-
166
-
167
-
168
-
169
-
170
-
171
-
172
-
173
-
174
-
175
-
176
-
177
-
178
-
179
-
180
-
181
-
182
-
183
-
184
-
185
-
186
-
187
-
188
-
189
-
190
-
191
-
192
-
193
-
194
-
195
-
196
 |
 |