HP Workstation x2100 hp workstation x2100 - Technical reference manual - Page 134
Removing And Replacing A Hard Disk Drive, use
 |
View all HP Workstation x2100 manuals
Add to My Manuals
Save this manual to your list of manuals |
Page 134 highlights
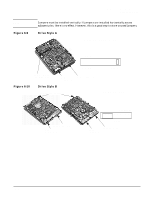
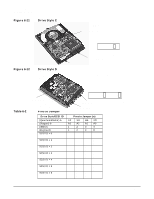
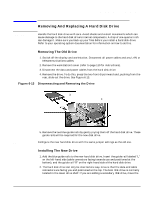
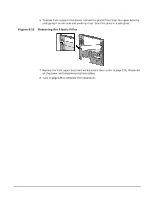
Installing Or Replacing Parts And Accessories Removing And Replacing A Hard Disk Drive NOTE boot drive to the upper shelf and install the secondary drive in the lower shelf. This will insure the cables are positioned correctly. This procedure is not necessary if the drive is a SCSI drive. 3. Align the guide rails on both sides of the drive with the internal shelf guides and then slide the drive in until it clicks into position. Avoid trapping or disconnecting the hard disk drive bay thermal sensor cable. If this cable becomes disconnected, reconnect it to the system board connector marked THERMAL_SENSOR (positioned near the IDE and Floppy data cable connectors). 4. Connect the power cable and the data cable to the new hard disk drive. The connectors are shaped to go in one way only. If you are not sure which connector to use, refer to "Mass Storage And Optical Device Overview" on page 125. 5. Replace the workstation's cover (refer to page 119). Reconnect all the power and telecommunications cables. 6. Turn to page 138 to complete the installation. 134 Chapter 6
-
 1
1 -
2
-
3
-
4
-
5
-
6
-
7
-
8
-
9
-
10
-
11
-
12
-
13
-
14
-
15
-
16
-
17
-
18
-
19
-
20
-
21
-
22
-
23
-
24
-
25
-
26
-
27
-
28
-
29
-
30
-
31
-
32
-
33
-
34
-
35
-
36
-
37
-
38
-
39
-
40
-
41
-
42
-
43
-
44
-
45
-
46
-
47
-
48
-
49
-
50
-
51
-
52
-
53
-
54
-
55
-
56
-
57
-
58
-
59
-
60
-
61
-
62
-
63
-
64
-
65
-
66
-
67
-
68
-
69
-
70
-
71
-
72
-
73
-
74
-
75
-
76
-
77
-
78
-
79
-
80
-
81
-
82
-
83
-
84
-
85
-
86
-
87
-
88
-
89
-
90
-
91
-
92
-
93
-
94
-
95
-
96
-
97
-
98
-
99
-
100
-
101
-
102
-
103
-
104
-
105
-
106
-
107
-
108
-
109
-
110
-
111
-
112
-
113
-
114
-
115
-
116
-
117
-
118
-
119
-
120
-
121
-
122
-
123
-
124
-
125
-
126
-
127
-
128
-
 129
129 -
 130
130 -
 131
131 -
 132
132 -
 133
133 -
 134
134 -
 135
135 -
 136
136 -
 137
137 -
 138
138 -
 139
139 -
140
-
141
-
142
-
143
-
144
-
145
-
146
-
147
-
148
-
149
-
150
-
151
-
152
-
153
-
154
-
155
-
156
-
157
-
158
-
159
-
160
-
161
-
162
-
163
-
164
-
165
-
166
-
167
-
168
-
169
-
170
-
171
-
172
-
173
-
174
-
175
-
176
-
177
-
178
-
179
-
180
-
181
-
182
-
183
-
184
-
185
-
186
-
187
-
188
-
189
-
190
-
191
-
192
-
193
-
194
-
195
-
196
 |
 |