HP Workstation xw4000 Rack mount tray installation - Page 3
Step 1—Preparing the workstation, Step 2—Mounting the rails to the rack - specifications
 |
View all HP Workstation xw4000 manuals
Add to My Manuals
Save this manual to your list of manuals |
Page 3 highlights
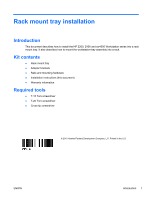
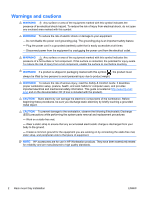
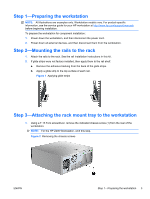
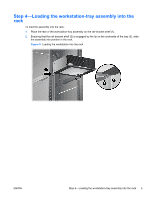
Step 1-Preparing the workstation NOTE: All illustrations are examples only. Workstation models vary. For product-specific information, see the service guide for your HP workstation at http://www.hp.com/support/manuals before beginning installation. To prepare the workstation for component installation: 1. Power down the workstation, and then disconnect the power cord. 2. Power down all external devices, and then disconnect them from the workstation. Step 2-Mounting the rails to the rack 1. Attach the rails to the rack. See the rail installation instructions in this kit. 2. If glide strips were not factory-installed, then apply them to the rail shelf. a. Remove the adhesive backing from the back of the glide strips. b. Apply a glide strip to the top surface of each rail. Figure 1 Applying glide strips Step 3-Attaching the rack mount tray to the workstation 1. Using a T-15 Torx screwdriver, remove the indicated chassis screw (1) from the rear of the workstation. NOTE: For the HP Z200 Workstation, omit this step. Figure 2 Removing the chassis screws ENWW Step 1-Preparing the workstation 3
-
 1
1 -
 2
2 -
 3
3 -
 4
4 -
 5
5 -
 6
6
 |
 |