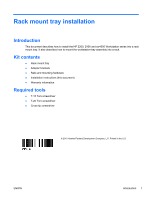
HP Workstation xw4000 Rack mount tray installation - Page 6
Step 5—Completing installation - manual
 |
View all HP Workstation xw4000 manuals
Add to My Manuals
Save this manual to your list of manuals |
Page 6 highlights
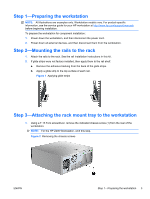
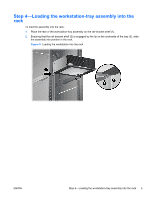
3. Secure the assembly into the rack by tightening the silver captive screws (1). Figure 6 Completing installation NOTE: To remove the assembly from the rack, loosen the silver captive screws (1), and then pull the handle to slide the assembly out of the rack until the latches in the tray (2) engage the stop feature. Reach under the assembly and release the latches (2) to disengage the tray from the rails. CAUTION: For removal, the workstation must be supported once the latches are disengaged. Step 5-Completing installation 1. Reconnect power to the workstation. 2. Restore power to the workstation. Japanese 日本語 This document is available in Japanese. See http://www.hp.com/support/manuals, then select your product and select Japanese from the drop down Manual Language menu http://www.hp.com/support/manuals Manual Language Japanese 6 Rack mount tray installation ENWW
-
 1
1 -
 2
2 -
 3
3 -
 4
4 -
 5
5 -
 6
6
 |
 |
