HP Workstation xw4000 SCSI Hard Drive Installation - HP Workstation xw Series - Page 2
Installing the Hard Drive
 |
View all HP Workstation xw4000 manuals
Add to My Manuals
Save this manual to your list of manuals |
Page 2 highlights
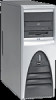
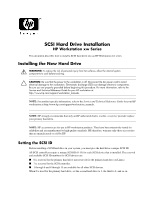
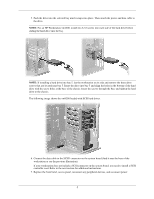
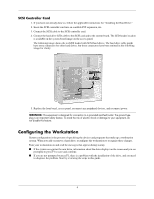
To set the SCSI ID on a drive, see the instructions on top/back of the hard drive for the correct jumper settings. The drive probably displays a diagram of the jumper block. This diagram shows you what blocks to cover with your jumper to get the desired ID. For example, if the drive needs to be set to 3, the drive might show that the 4 ID bits are at the far left of the connector (ID0, ID1, ID2, and ID3), then using the jumpers provided, cover each block to set the SCSI ID. Installing the Hard Drive After you have given the hard drive a unique SCSI ID, you can install the hard drive into your system. NOTE: For product-specific information, refer to the Service and Technical Reference Guide for your HP workstation at http://www.hp.com/support/workstation_manuals. 1. Disconnect power from the system and remove the access panel. 2. Select a drive bay in which to install the drive. If installing more than one hard drive, install drives in the order as shown in the following illustrations. NOTE: If you workstation does not have drive rails or you are installing the hard drive into bay 5, skip to step 5. 4 3 2 1 2 2 1 1 5 3. Squeeze the green tabs inward and slide the rails out of the empty bay. 4. Attach the rails to the hard drive by first inserting the hard drive rail assembly pins into one side of the hard drive screw holes. Next, gently flex open the opposite side of the hard drive rail assembly and insert the remaining pins into the holes in the hard drive. 2
-
 1
1 -
 2
2 -
 3
3 -
 4
4 -
 5
5 -
 6
6 -
 7
7 -
 8
8 -
9
-
10
-
11
-
12
-
13
-
14
-
15
-
16
-
17
-
18
 |
 |