HP Workstation xw6000 hp workstations xw6000 - hardware reference guide (30115 - Page 81
Index
 |
View all HP Workstation xw6000 manuals
Add to My Manuals
Save this manual to your list of manuals |
Page 81 highlights
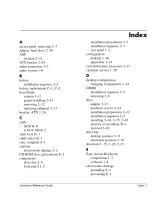
A access panel, removing 2-3 adapter, hard drive 2-16 AGP location 2-22 ATX bracket 2-24 audio connectors 1-3 audio system 1-6 B battery installation sequence 2-2 battery replacement C-1, C-2 bezel blank caution 1-13 proper handling 2-13 removing 2-12 replacing subpanel 2-13 bracket, ATX 2-24 C cable SCSI B-6 UATA-100 B-2 cable lock D-1 cable-select B-1 care, computer F-1 cautions electrostatic damage 2-2 CD-ROM drive, precautions F-2 components drive bay 2-9 front panel 1-2 Hardware Reference Guide Index installation precautions 2-1 installation sequence 2-1 rear panel 1-3 configuration desktop 1-10 minitower 1-14 cool-down time, processor 2-31 customer service 1-10 D desktop configuration changing to minitower 1-14 DIMM installation sequence 2-2 removing 2-8 drive adapter 2-17 hardware screws 2-14 installation preparation 2-12 installation sequence 2-2 installing 2-14, 2-15, 2-16 primary or secondary B-1 removal 2-19 drive bay desktop position 2-11 minitower position 2-10 drivelock 1-15, 2-20, 2-21 E Easy Access Keyboard components 1-7 software 1-8 electrostatic damage grounding E-2 preventing E-1 Index-1
-
 1
1 -
2
-
3
-
4
-
5
-
6
-
7
-
8
-
9
-
10
-
11
-
12
-
13
-
14
-
15
-
16
-
17
-
18
-
19
-
20
-
21
-
22
-
23
-
24
-
25
-
26
-
27
-
28
-
29
-
30
-
31
-
32
-
33
-
34
-
35
-
36
-
37
-
38
-
39
-
40
-
41
-
42
-
43
-
44
-
45
-
46
-
47
-
48
-
49
-
50
-
51
-
52
-
53
-
54
-
55
-
56
-
57
-
58
-
59
-
60
-
61
-
62
-
63
-
64
-
65
-
66
-
67
-
68
-
69
-
70
-
71
-
72
-
73
-
74
-
75
-
 76
76 -
 77
77 -
 78
78 -
 79
79 -
 80
80 -
 81
81 -
 82
82 -
 83
83
 |
 |