HP Xw6200 Processor Installation - HP Workstations - Page 4
Screw in the four fansink screws. First, tighten all of the screws partially so that the fansink - heatsink
 |
UPC - 882780333536
View all HP Xw6200 manuals
Add to My Manuals
Save this manual to your list of manuals |
Page 4 highlights
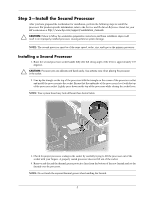
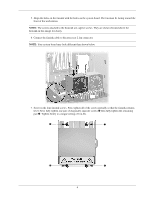
5. Align the holes on the fansink with the holes on the system board. The fan must be facing toward the front of the workstation. NOTE: The screws attached to the heatsink are captive screws. They are shown elevated above the heatsink in this image for clarity. 6. Connect the fansink cable to the processor 2 fan connector. NOTE: Your system board may look different than shown below. 7. Screw in the four fansink screws. First, tighten all of the screws partially so that the fansink remains level. Next, fully tighten one pair of diagonally opposite screws 1 then fully tighten the remaining pair 2. Tighten firmly to a torque setting of 6 in-lbs. 1 2 2 1 4
-
 1
1 -
 2
2 -
 3
3 -
 4
4 -
 5
5 -
 6
6 -
 7
7 -
 8
8 -
 9
9 -
 10
10 -
11
-
12
-
13
-
14
 |
 |

4
5.
Align the holes on the fansink with the holes on the system board. The fan must be facing toward the
front of the workstation.
NOTE:
The screws attached to the heatsink are captive screws. They are shown elevated above the
heatsink in this image for clarity.
6.
Connect the fansink cable to the processor 2 fan connector.
NOTE:
Your system board may look different than shown below.
7.
Screw in the four fansink screws. First, tighten all of the screws partially so that the fansink remains
level. Next, fully tighten one pair of diagonally opposite screws
1
then fully tighten the remaining
pair
2
. Tighten firmly to a torque setting of 6 in-lbs.
1
1
2
2