HP Xw6400 Second Xeon processor installation - Page 5
Step 6-Reassemble the workstation - fan
 |
UPC - 882780645493
View all HP Xw6400 manuals
Add to My Manuals
Save this manual to your list of manuals |
Page 5 highlights
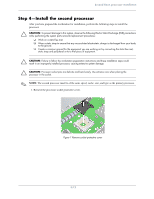
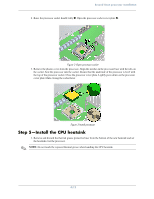
Second Xeon processor installation 2. Align the heatsink posts with the holes on the system board 1. The fan must be facing toward the front of the workstation. Connect the heatsink wire to the second processor heatsink fan connector on the system board 2. Figure 4 Install heatsink 3. Tighten the four heatsink screws. First, tighten all screws partially so that the heatsink remains level. Next, fully tighten one pair of diagonally opposite screws 1, then fully tighten the remaining pair 2. Tighten to 6 in.-lbs. of torque. Figure 5 Tighten heatsink screws Step 6-Reassemble the workstation After installing the second processor and related components, reassemble the workstation using the instructions in the workstation documentation. The reassembly process involves reinstalling the side access panel and restoring power to the workstation. 5/12
-
 1
1 -
 2
2 -
 3
3 -
 4
4 -
 5
5 -
 6
6 -
 7
7 -
 8
8 -
 9
9 -
 10
10 -
 11
11 -
12
 |
 |
