HP Xw9300 Rack Kit - HP Sliding Rack Mount Kit Installation - xw8200/9300 Work - Page 2
Remove the Top Cover and Foot, If the top cover is difficult to remove
 |
View all HP Xw9300 manuals
Add to My Manuals
Save this manual to your list of manuals |
Page 2 highlights
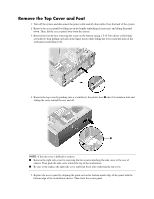
Remove the Top Cover and Foot 1. Turn off the system and disconnect the power cable and all other cables from the back of the system. 2. Remove the access panel by lifting up on the handle (unlocking if necessary) and tilting the panel down. Then, lift the access panel away from the chassis. 3. Remove the foot by first removing the screw on the bottom (using a T-15 Torx driver or flat blade screwdriver) then pulling outward on the finger notch while sliding the foot toward the front of the workstation and lifting it off. 4. Remove the top cover by pushing (use a screwdriver) the plastic boss 1 out of its retention hole and sliding the cover toward the rear and off. 1 NOTE: If the top cover is difficult to remove: ■ Remove the right side cover by removing the two screws attaching the side cover to the rear of chassis. Then push the side cover toward the top of the workstation. ■ Be sure to the replace the right side cover and front bezel after removing the top cover. 5. Replace the access panel by aligning the guide rail on the bottom inside edge of the panel with the bottom edge of the workstation chassis. Then close the access panel.
-
 1
1 -
 2
2 -
 3
3 -
 4
4 -
 5
5 -
 6
6 -
 7
7 -
 8
8 -
9
-
10
-
11
-
12
-
13
-
14
-
15
-
16
 |
 |
