HP Xw9300 Rack Kit - HP Sliding Rack Mount Kit Installation - xw8200/9300 Work - Page 4
Install the Rails to the Rack
 |
View all HP Xw9300 manuals
Add to My Manuals
Save this manual to your list of manuals |
Page 4 highlights
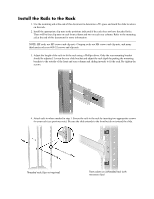
Install the Rails to the Rack 1. Use the mounting aid at the end of this document to determine a 5U space and mark the slide locations on the rack. 2. Install the appropriate clip nuts in the positions indicated if the rack does not have threaded holes. There will be four clip nuts on each front column and two on each rear column. Refer to the mounting aid at the end of this document for more information. NOTE: HP racks use M5 screws and clip nuts. Compaq racks use M6 screws and clip nuts, and many third-party racks use #10-32 screws and clip nuts. 3. Adjust the length of the rails to fit the rack using a Phillips driver. Only the rear mounting bracket should be adjusted. Loosen the rear slide bracket and adjust the rack depth by putting the mounting brackets to the outside of the front and rear columns and sliding inwards to fit the rack. Re-tighten the screws. 4. Attach rails to where marked in step 1. Secure the rails to the rack by inserting two appropriate screws for your rack (see previous note). Be sure the slide extends to the front but do not extend the slide. Threaded rack (clips not required) Front column on unthreaded rack (with necessary clips)
-
 1
1 -
 2
2 -
 3
3 -
 4
4 -
 5
5 -
 6
6 -
 7
7 -
 8
8 -
 9
9 -
 10
10 -
11
-
12
-
13
-
14
-
15
-
16
 |
 |
