HP Xw9300 Rack Kit - HP Sliding Rack Mount Kit Installation - xw8200/9300 Work - Page 6
Mounting Aid, The 5U space will be the top of the workstation after it is installed.
 |
View all HP Xw9300 manuals
Add to My Manuals
Save this manual to your list of manuals |
Page 6 highlights
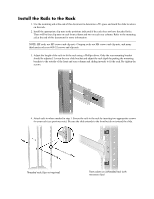
7. Secure the workstation to the rack using four of the same screws that were used to attach the slide assemblies. Use two screws in each mounting flange. Mounting Aid 1. Place the next page on the bottom of the rack (or on top of an already installed unit in a rack). 2. Align the outlined holes with the rack holes to determine a 5U space. 3. The 5U space will be the top of the workstation after it is installed. 4. Mark the two spaces below the 3U line. This will be the center line of the slides.
-
 1
1 -
 2
2 -
 3
3 -
 4
4 -
 5
5 -
 6
6 -
 7
7 -
 8
8 -
 9
9 -
 10
10 -
 11
11 -
 12
12 -
13
-
14
-
15
-
16
 |
 |

7.
Secure the workstation to the rack using four of the same screws that were used to attach the slide
assemblies. Use two screws in each mounting flange.
Mounting Aid
1.
Place the next page on the bottom of the rack (or on top of an already installed unit in a rack).
2.
Align the outlined holes with the rack holes to determine a 5U space.
3.
The 5U space will be the top of the workstation after it is installed.
4.
Mark the two spaces below the 3U line. This will be the center line of the slides.