HP dx2040 Service Reference Guide: HP Compaq dx2040 Business PC - Page 20
Computer Setup—Exit, Recovering the Configuration Settings, Backing Up the CMOS, Restoring the CMOS
 |
View all HP dx2040 manuals
Add to My Manuals
Save this manual to your list of manuals |
Page 20 highlights
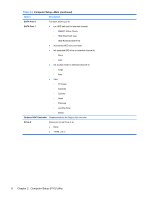
Table 2-6 Computer Setup-PC Health Option Description Current CPU Temperature (view only) Current System Temperature (view only) System Fan Speed (view only) Smart Fan Function Disables/enables smart fan functionality. Computer Setup-Exit Table 2-7 Computer Setup-Exit Option Description Save & Exit Setup Allows you to save current settings and exit Computer Setup. Exit Without Saving Allows you to exit Computer Setup without saving changes. Load Optimized Defaults Allows you to reset Computer Setup to factory defaults. Recovering the Configuration Settings Recovering the configuration settings established in the Computer Setup (F10) Utility requires that you first back up the settings before a recovery is needed. The CMOS Save/Load utility can be found at http://www.hp.com under the Software & Driver Downloads for your specific model. Download the firmware files into a folder on a removable storage device. It is recommended that you save any modified computer configuration settings to a diskette, a USB flash media device, or a diskette-like device (a storage device set to emulate a diskette drive) and save the diskette or device for possible future use. Backing Up the CMOS 1. Make sure the computer to be backed up is turned on. Connect the removable storage to the computer. 2. Boot to DOS. 3. Type N:\folder\BIOS.exe SAVE:ABC001.DAT (where N is the drive letter of the removable storage) to save the CMOS setting to the removable storage device. Restoring the CMOS 1. Make sure the target computer is turned on. Connect the removable storage to the target computer. 2. Boot to DOS. 3. Type N:\folder\BIOS.exe LOAD:ABC001.DAT (where N is the drive letter of the removable storage) to load the custom CMOS setting onto the target system. 12 Chapter 2 Computer Setup (F10) Utility
-
 1
1 -
2
-
3
-
4
-
5
-
6
-
7
-
8
-
9
-
10
-
11
-
12
-
13
-
14
-
 15
15 -
 16
16 -
 17
17 -
 18
18 -
 19
19 -
 20
20 -
 21
21 -
 22
22 -
 23
23 -
 24
24 -
 25
25 -
26
-
27
-
28
-
29
-
30
-
31
-
32
-
33
-
34
-
35
-
36
-
37
-
38
-
39
-
40
-
41
-
42
-
43
-
44
-
45
-
46
-
47
-
48
-
49
-
50
-
51
-
52
-
53
-
54
-
55
-
56
-
57
-
58
-
59
-
60
-
61
-
62
-
63
-
64
-
65
-
66
-
67
-
68
-
69
-
70
-
71
-
72
-
73
-
74
-
75
-
76
-
77
-
78
-
79
-
80
-
81
-
82
-
83
-
84
-
85
-
86
-
87
-
88
-
89
 |
 |
