HP mp2200 User Guide - Page 48
Installing for rear projection, Locking the projector
 |
View all HP mp2200 manuals
Add to My Manuals
Save this manual to your list of manuals |
Page 48 highlights
Installing for rear projection 1. Place the projector 1.5 to 10 m (5 to 33 ft) behind a translucent screen that is designed for rear projection. See "Setting up the projector" on page 13 for more instructions. 2. Press enter, go to Setup > Picture orientation. Then select Rear Normal. Locking the projector The projector includes a built in slot to secure the projector with a cable and lock (such as the Kensington MicroSaver lock system, available at many computer stores). 1. Wrap the cable around a secure object, such as a table leg. Loop the cable to create a slip knot around the stationary object, and be sure it cannot slip off. 2. Insert the lock 1 into the hole and twist the key 2. 48 Installing Permanently
-
 1
1 -
2
-
3
-
4
-
5
-
6
-
7
-
8
-
9
-
10
-
11
-
12
-
13
-
14
-
15
-
16
-
17
-
18
-
19
-
20
-
21
-
22
-
23
-
24
-
25
-
26
-
27
-
28
-
29
-
30
-
31
-
32
-
33
-
34
-
35
-
36
-
37
-
38
-
39
-
40
-
41
-
42
-
 43
43 -
 44
44 -
 45
45 -
 46
46 -
 47
47 -
 48
48 -
 49
49 -
 50
50 -
 51
51 -
 52
52 -
 53
53 -
54
-
55
-
56
-
57
-
58
-
59
-
60
-
61
-
62
-
63
-
64
 |
 |

Installing Permanently
48
Installing for rear projection
1.
Place the projector 1.5 to 10 m (5 to 33 ft) behind a translucent screen that is designed for
rear projection.
See “Setting up the projector” on page 13 for more instructions.
2.
Press
enter
,
,
,
, go to
Setup > Picture orientation.
Then select
Rear Normal.
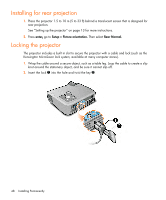
Locking the projector
The projector includes a built in slot to secure the projector with a cable and lock (such as the
Kensington MicroSaver lock system, available at many computer stores).
1.
Wrap the cable around a secure object, such as a table leg. Loop the cable to create a slip
knot around the stationary object, and be sure it cannot slip off.
2.
Insert the lock
1
into the hole and twist the key
2
.