HP nx9105 Reference Guide
HP nx9105 - Notebook PC Manual
 |
View all HP nx9105 manuals
Add to My Manuals
Save this manual to your list of manuals |
HP nx9105 manual content summary:
- HP nx9105 | Reference Guide - Page 1
Reference Guide HP Notebook Expansion Base Document Part Number: 358831-001 July 2004 This document provides instructions on how to use the HP Notebook Expansion Base with select models of HP and Compaq notebooks. - HP nx9105 | Reference Guide - Page 2
© Copyright 2004 Hewlett-Packard Development Company, L.P. Microsoft and Windows are U.S. registered trademarks of Microsoft Corporation. The information contained herein is subject to change without notice. The only warranties for HP products and services are set forth in the express warranty - HP nx9105 | Reference Guide - Page 3
to AC Power 1-8 Step 3: Connecting the Notebook 1-10 2 Using the Expansion Base Expansion Base Guidelines 2-1 Optional Wireless Accessories 2-2 Identifying the Wireless Receiver Buttons and Lights 2-3 Connecting the Wireless Keyboard and Mouse . . . . 2-4 Identifying the Wireless Keyboard Quick - HP nx9105 | Reference Guide - Page 4
Audio 2-15 Installing an Optional Hard Drive 2-16 Connecting an Optional Security Cable 2-23 3 Removing the Notebook A Troubleshooting Getting More Information A-1 Using the World Wide Web A-1 Preparing to Call Technical Support A-2 Solving Common Problems A-3 Index iv Reference Guide - HP nx9105 | Reference Guide - Page 5
this chapter, refer to Chapter 2, "Using the Expansion Base." ✎ The Expansion Base may have features that are not supported by your notebook. For information on supporting signals that are transmitted through your notebook expansion port, refer to your notebook documentation. Reference Guide 1-1 - HP nx9105 | Reference Guide - Page 6
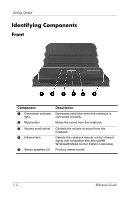
blue when the notebook is connected correctly. Mutes the sound from the notebook. Controls the volume of sound from the notebook. Detects the notebook remote control infrared signal (not compatible with Microsoft® Windows® Media Center Edition notebooks). Produce stereo sound. 1-2 Reference Guide - HP nx9105 | Reference Guide - Page 7
Component 1 Expansion cable Description Connects the Expansion Base to a notebook. 2 Power connectors (3) 3 USB ports (2) Connect the Expansion Base to notebook AC adapter. Connect USB devices; USB 2.0 compatible. 4 RJ-11 (telephone) jack Connects the Expansion Base to an RJ-11 wall jack. (See - HP nx9105 | Reference Guide - Page 8
These solutions do not prevent the product from being mishandled or stolen. q Hard drive carrier screw Secures the hard drive carrier. w RJ-11 (telephone) jack Connects a modem cable from the Expansion Base to a notebook. (See also 4). ✎ For more information on these components, refer to Chapter - HP nx9105 | Reference Guide - Page 9
Right Side Getting Started Right side (viewed from the front of the Expansion Base) Component 1 Audio-out (headphone) jack 2 Audio-in (microphone) jack 3 USB port Description Connects a headphone. Connects a microphone. Connects USB devices; USB 2.0 compatible. Reference Guide 1-5 - HP nx9105 | Reference Guide - Page 10
Left Side Left side (viewed from the front of the Expansion Base) Component Description Hard drive carrier Holds an optional internal hard drive. ✎ For information on installing an optional internal hard drive, refer to "Installing an Optional Hard Drive" in Chapter 2. 1-6 Reference Guide - HP nx9105 | Reference Guide - Page 11
Getting Started Setting Up the Expansion Base Step 1: Adjusting the Expansion Base The Expansion Base must be upright before a notebook is attached. » To adjust the Expansion Base to an upright position, lift the upper panel to the appropriate height. Reference Guide 1-7 - HP nx9105 | Reference Guide - Page 12
out the handles on each side of the Expansion Base 1. 2. Grasp the handles and lower the upper panel of the Expansion Base 2. Step 2: Connecting to AC Power Å WARNING: To reduce the risk of electric shock or damage to your equipment: ■ Plug the power cord into an electrical outlet that is easily - HP nx9105 | Reference Guide - Page 13
Started For optimal performance, connect the Expansion Base to an AC power source using the notebook AC adapter and power cord. 1. Connect the notebook AC adapter to the matching connector on the Expansion Base 1. Depending on your power requirements, 3 power connectors are available on the rear of - HP nx9105 | Reference Guide - Page 14
Step 3: Connecting the Notebook 1. Open the notebook. 2. Slide the notebook into the Expansion Base with the keyboard facing you. 1-10 ✎ The notebook is held in place by a buffer pad, which prevents the notebook from shifting out of its proper position in the Expansion Base. Reference Guide - HP nx9105 | Reference Guide - Page 15
cable from its docked location and slide it to either side of the Expansion Base, depending on where the expansion port on your notebook is located. The location of the expansion port on your notebook may vary by notebook series and model. ✎ It is important to position the cable correctly, so that - HP nx9105 | Reference Guide - Page 16
with the icon on the end of the expansion cable. 5. For optional communication, do one of the following: ❏ If you are using a modem with your notebook to communicate using an analog telephone line, refer to "Connecting to a Modem" in Chapter 2. ❏ If you are connecting directly to a network, refer to - HP nx9105 | Reference Guide - Page 17
Getting Started 6. If the notebook is not already turned on, press the power button on the notebook to turn it on. ✎ The power button location on the notebook may vary by notebook series and model. Reference Guide 1-13 - HP nx9105 | Reference Guide - Page 18
Getting Started If the notebook connection was made properly, the connection indicator light will light up solid blue. ✎ After the notebook is connected to the Expansion Base, the internal notebook speakers are disabled and the Expansion Base speakers are activated. 1-14 Reference Guide - HP nx9105 | Reference Guide - Page 19
Base Expansion Base Guidelines ■ Operating systems-For optimal performance, use the Expansion Base with HP or Compaq notebooks running Microsoft® Windows® XP or later. ■ Power-For optimal performance, use the Expansion Base while connected to electrical power. This allows the notebook battery - HP nx9105 | Reference Guide - Page 20
. 2 Wireless keyboard Connects to the Expansion Base without a cable. 3 Wireless mouse Connects to the Expansion Base without a cable. 4 Batteries To be inserted into the wireless keyboard and mouse. ✎ The wireless accessories may be included with the Expansion Base. 2-2 Reference Guide - HP nx9105 | Reference Guide - Page 21
lock light 3 Connect button 4 Keyboard battery light 5 Mouse battery light Description On: Keyboard caps lock has been enabled. On: Keyboard num lock has been enabled. Connects wireless devices. On: Keyboard battery has low or no power. On: Mouse battery has low or no power. Reference Guide 2-3 - HP nx9105 | Reference Guide - Page 22
Using the Expansion Base Connecting the Wireless Keyboard and Mouse 1. Turn the wireless keyboard upside down to locate the battery cover 1. 2. Release the battery cover latch 2 and remove the battery cover 3. 2-4 Reference Guide - HP nx9105 | Reference Guide - Page 23
Using the Expansion Base 3. Insert a battery into the battery slot and push it into the back of the slot 1. 4. Insert the second battery 2. 5. Replace the battery cover on the keyboard 3. Reference Guide 2-5 - HP nx9105 | Reference Guide - Page 24
Using the Expansion Base 6. Remove the battery cover from the mouse. 7. Insert the batteries into the mouse 1. 8. Replace the battery cover 2. 2-6 Reference Guide - HP nx9105 | Reference Guide - Page 25
Using the Expansion Base 9. Connect the wireless receiver to a USB port on the Expansion Base. Reference Guide 2-7 - HP nx9105 | Reference Guide - Page 26
Using the Expansion Base 10. Press the connect button on the receiver 1. 11. While the button on the receiver is flashing, press the connect button on the bottom of the keyboard 2. 12. Turn the keyboard right-side up. 13. Wait 20 seconds. 2-8 Reference Guide - HP nx9105 | Reference Guide - Page 27
the wireless mouse also, press the connect button on the receiver again 1. 15. While the button on the receiver is flashing, press the connect button on the bottom of the mouse 2. Your wireless keyboard and mouse will now operate while a notebook is connected to the Expansion Base. Reference Guide - HP nx9105 | Reference Guide - Page 28
Using the Expansion Base Identifying the Wireless Keyboard Quick Launch Buttons Component 1 Media 2 Play/Pause 3 Mute 4 player while in use. Mutes the volume on the Expansion Base. Controls the volume of the Expansion Base. Opens your Favorites folder. Opens your email program. Opens - HP nx9105 | Reference Guide - Page 29
the RJ-11 connector on the notebook 2. 2. Connect one end of the long modem cable into the RJ-11 (telephone) connector on the lower rear panel of the Expansion Base 3. Connect the other end of the cable into the RJ-11 wall jack 4. ✎ A country-specific modem adapter also may be required, in addition - HP nx9105 | Reference Guide - Page 30
to a network. This requires an RJ-45 Ethernet cable (purchased separately). 1. If you haven't already done so, connect the Expansion Base to your notebook following the instructions in Chapter 1, "Getting Started." 2. Connect one end of the Ethernet cable to the RJ-45 (network) jack on the Expansion - HP nx9105 | Reference Guide - Page 31
an external display. The Expansion Base provides 2 video-out ports on to determine if S-Video connection is supported. Composite Video Connection To connect through composite the yellow composite video jack on the back of the Expansion Base 1. 2. Connect the other end of the cable into the - HP nx9105 | Reference Guide - Page 32
Using the Expansion Base 3. Verify that your television is displaying the correct video source. Refer to your television documentation for instructions. 4. Press fn+f4 on the notebook to change your video output mode. Press fn+f4 repeatedly to cycle through the available video modes. 5. Refer to the - HP nx9105 | Reference Guide - Page 33
5. Refer to the instructions provided with your notebook to configure the television as the primary display or to configure advanced video features. Connecting Audio The Expansion Base provides an S/PDIF digital audio jack for an optional digital audio connection. A coaxial digital audio cable (not - HP nx9105 | Reference Guide - Page 34
> OK. ✎ You must reenable analog audio anytime you wish to play a DVD without an S/PDIF connection. Installing an Optional Hard Drive You can install an optional hard drive into the Expansion Base for extra storage capacity. ✎ The Expansion Base supports IDE hard drives with an ATAor ATAPI-compliant - HP nx9105 | Reference Guide - Page 35
Base Identify the following components that may be required when you install an optional internal hard drive. Component 1 Hard drive Description Provides optional internal storage. 2 Hard drive power cord Connects to an AC wall outlet. 3 Hard drive power adapter Connects to the hard drive - HP nx9105 | Reference Guide - Page 36
. ❏ To remove the hard drive carrier, remove the screw located on the rear of the Expansion Base 1, and then remove the hard drive carrier 2. ❏ To remove the hard drive cover, remove the screw located on the rear of the Expansion Base 1, and then remove the hard drive cover 2. 2-18 Reference Guide - HP nx9105 | Reference Guide - Page 37
Using the Expansion Base 2. Turn the hard drive carrier over. Reference Guide 2-19 - HP nx9105 | Reference Guide - Page 38
Using the Expansion Base 3. Connect the hard drive power cable 1 and the hard drive data cable 2 to the hard drive. 4. Insert the hard drive into the hard drive carrier 3 and secure the assembly with 2 screws on each side 4. ✎ Two extra screws are provided. ✎ Be sure the optional hard drive is set - HP nx9105 | Reference Guide - Page 39
Using the Expansion Base 5. Turn hard drive carrier back over. Reference Guide 2-21 - HP nx9105 | Reference Guide - Page 40
Remove the hard drive power connector cover 3. 8. Connect the hard drive power adapter to the Expansion Base 4. 9. Connect the power cord to the hard drive power adapter 5, and then connect the power cord to the wall outlet 6. ✎ For more information on the hard drive, refer to the instructions that - HP nx9105 | Reference Guide - Page 41
product from being mishandled or stolen. ✎ Two Kensington security slots are provided. Use either security slot to connect an optional security cable and secure your Expansion Base. 1. With the notebook positioned in the Expansion Base, loop the security cable (purchased separately) around a secure - HP nx9105 | Reference Guide - Page 42
from the Expansion Base if your operating system is Windows XP or later. 1. Press the buttons on the sides of the expansion cable connector 1 to disconnect the cable from the notebook 2. ✎ The location of the expansion port on the notebook may vary by notebook series and model. Reference Guide 3-1 - HP nx9105 | Reference Guide - Page 43
Removing the Notebook 2. Disconnect the modem cable from the RJ-11 (telephone) jack on the notebook, if connected. You may leave the other end of the cable connected to the Expansion Base for future use. 3. Slide the notebook up and out of the Expansion Base. 3-2 Reference Guide - HP nx9105 | Reference Guide - Page 44
work habits for computer users, and provides important electrical and mechanical safety information. This guide is located on the Web site at http://www.hp.com/ergo. Using the World Wide Web Support services are available on the Internet through Customer Care. You can either browse the postings as - HP nx9105 | Reference Guide - Page 45
Support If you cannot solve a problem using the troubleshooting tips in this section, you may need to call Customer Care. When you call technical support, have the following information available: ■ The notebook and Expansion Base model types ■ Serial numbers for the notebook and Expansion Base - HP nx9105 | Reference Guide - Page 46
scroll speakers are muted or wheel. the volume is set too low. The notebook shuts down unexpectedly. The Expansion Base is not connected to AC power, draining the notebook battery pack. Connect the AC adapter from the Expansion Base to an AC power outlet. (continued) Reference Guide A-3 - HP nx9105 | Reference Guide - Page 47
Refer to "Optional Wireless Accessories" in Chapter 2. The keyboard or mouse has no battery power. Be sure that batteries are inserted correctly in the keyboard or mouse and that the batteries are functional. A connected home entertainment system does not have audio. Audio not connected properly - HP nx9105 | Reference Guide - Page 48
AC adapter 1-9 AC power cord 1-9, 2-22 AC power, connecting 1-8 additional information A-1 adjusting height of Expansion Base 1-7 audio connecting 2-15 troubleshooting A-4 audio receiver 2-15 audio-in (microphone) jack 1-5 audio-out (headphone) jack 1-5 B batteries identifying 2-2 wireless keyboard - HP nx9105 | Reference Guide - Page 49
Index television 2-13 video 2-13 wireless receiver 2-7 connection indicator light identifying 1-2 not illuminated A-3 connectors hard drive power 1-3 power 1-3 D dial-up communication 2-11 digital audio driver, enabling 2-16 digital audio jack, Sony/Philips Digital Interface (S/PDIF) 1-3 digital - HP nx9105 | Reference Guide - Page 50
Expansion Base 1-12, 2-12 notebook connecting expansion cable 1-12 opening 1-10 removing from Expansion Base 3-1 shuts down, troubleshooting A-3 turning on 1-13 num lock light 2-3 O opening notebook 1-10 operating systems 2-1 P ports USB 1-3, 1-5 power connecting 1-8 guidelines 2-1 Reference Guide - HP nx9105 | Reference Guide - Page 51
A-3 stereo, connecting audio 2-15 support services A-1 S-Video cable 2-14 S-Video jack connecting video 2-14 identifying 1-3 T technical support A-2 television composite video jack 1-3 connecting 2-13 connecting audio 2-15 S-Video jack 1-3 troubleshooting A-1 turning on the notebook 1-13 U USB ports - HP nx9105 | Reference Guide - Page 52
Index W Web sites HP A-1 HP Customer Care Center A-1 safety information A-1 wireless accessories 2-2 wireless keyboard does not work A-4 identifying 2-2 QuickLaunch buttons 2-10 using 2-4 wireless mouse does not work A-4 identifying 2-2 settings 2-11 using 2-4 wireless receiver connect button 2-3
-
 1
1 -
 2
2 -
 3
3 -
 4
4 -
 5
5 -
 6
6 -
 7
7 -
8
-
9
-
10
-
11
-
12
-
13
-
14
-
15
-
16
-
17
-
18
-
19
-
20
-
21
-
22
-
23
-
24
-
25
-
26
-
27
-
28
-
29
-
30
-
31
-
32
-
33
-
34
-
35
-
36
-
37
-
38
-
39
-
40
-
41
-
42
-
43
-
44
-
45
-
46
-
47
-
48
-
49
-
50
-
51
-
52
 |
 |

Reference Guide
HP Notebook Expansion Base
Document Part Number: 358831-001
July 2004
This document provides instructions on how to use the
HP Notebook Expansion Base with select models of HP
and Compaq notebooks.