HP rp2470 rp24xx A180 User Manual - Page 57
Step 2., Interact With Sd-ux?
 |
View all HP rp2470 manuals
Add to My Manuals
Save this manual to your list of manuals |
Page 57 highlights
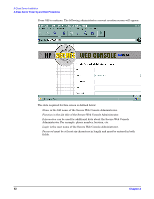
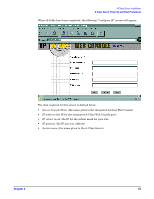
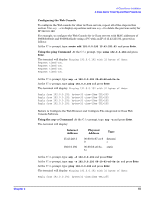
A-Class Server Installation A-Class Server Power Up and Boot Procedures INSTALL HP-UX Press Enter. The console will display another menu. Select: STANDARD LVM CONFIGURATION Press Enter. The console will display another menu. To the query: INTERACT WITH SD-UX? type: no Press Enter. The system will begin the software installation process. Step 2. When installation is complete, the server will reboot and the console will display the following prompt: Are you ready to link the system to a network? Press Y or N then press return. Type: n Press Enter. When prompted by the console display, enter the time and system name. The server should now function as a stand-alone system, except for an error in the /etc/rc.log file stating that the program "swagentd" could not start. This is because the new kernel was not built with enough networking support to allow the SD-UX (swinstall) software to run since no valid network drivers (btlan3) were found on the 10.20 media. To rebuild the kernel to allow the swinstall software to run, follow the remainder of this procedure. Step 3. Log in as a "root" user and edit the "/stand/system" file to add the line: lan0. When the system prompt "#" displays, type the following command: vi/stand/system Press Enter. Step 4. To rebuild the kernel, type the following command at the "#" prompt: mk_kernel -o/stand/vmunix Press Enter. NOTE Disregard the /usr/ccs/bin/ld: (Warning) "Linker features were used..." This warning does not apply to this procedure. To reboot the system, type the following command when the system prompt "#" displays: reboot -r Press Enter. Step 5. To make the SD-UX install software work, type the following command when the system prompt "#" displays: mknot/dev/lan0 c 52 0x000000 Press Enter. The SD-UX software should now work properly. Step 6. The following command string is for DDS installation of the XSW800HWECR1020 (version XR41) bundle from removable media. This procedure will install the "btlan3" driver and reboot the server, but it will not automatically add "btlan3" support to the kernel. Type the following command when the system prompt "#" displays: swinstall -x autoreboot=true -x match_target=true -s/dev/rmt/0m Press Enter. The "btlan3" driver will be installed and the server will reboot. Chapter 2 57
-
 1
1 -
2
-
3
-
4
-
5
-
6
-
7
-
8
-
9
-
10
-
11
-
12
-
13
-
14
-
15
-
16
-
17
-
18
-
19
-
20
-
21
-
22
-
23
-
24
-
25
-
26
-
27
-
28
-
29
-
30
-
31
-
32
-
33
-
34
-
35
-
36
-
37
-
38
-
39
-
40
-
41
-
42
-
43
-
44
-
45
-
46
-
47
-
48
-
49
-
50
-
51
-
 52
52 -
 53
53 -
 54
54 -
 55
55 -
 56
56 -
 57
57 -
 58
58 -
 59
59 -
 60
60 -
 61
61 -
 62
62 -
63
-
64
-
65
-
66
-
67
-
68
-
69
-
70
-
71
-
72
-
73
-
74
-
75
-
76
-
77
-
78
-
79
-
80
-
81
-
82
-
83
-
84
-
85
-
86
-
87
-
88
-
89
-
90
-
91
-
92
-
93
-
94
-
95
-
96
-
97
-
98
-
99
-
100
-
101
-
102
-
103
-
104
-
105
-
106
 |
 |
