HP rp2470 rp24xx A180 User Manual - Page 78
green POWER LED., Parity/Data Bits
 |
View all HP rp2470 manuals
Add to My Manuals
Save this manual to your list of manuals |
Page 78 highlights
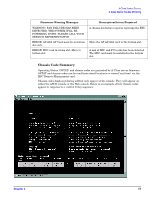
A-Class System Service A-Class Server Trouble Shooting each. The Secure Web Console displays the operational status of all components and peripherals, including its own, on the console screen. The screen will display selftest data output in one of two ways: If an HSC Remote Management card is installed, the output appears at the bottom of the screen and is updated until selftest is complete and the firmware Main Menu screen appears. If an HSC Remote Management card is not installed, there will be no output to the console screen until selftest completes. NOTE The Integrated LAN Web Console will be referred to as the Web console in this section. The A-Class server front panel LEDs do not indicate Web console failures. There are no blinking codes to show the source of a web console fault. To troubleshoot the Web console: 1. Make sure that a LAN cable is inserted into the LAN Web Console connector on the rear of the server. Refer to Chapter 2. 2. Log in to the Web console as the Administrator and check the DATACOM configuration. It should be: Baud Rate: 9600 Parity/Data Bits: None/8 Parity Checking: Enable should be off Recvpace/Xmitpace: Xon/Xoff should be off NOTE NOTE 78 Remember to use SAVE to retain any changes that you make. 3. Reset the Web console. a. Type the IP address of the Web console in your web browser's location window and press Enter. b. When the Web console page appears, log in. c. Click on the Reset Web Console option. Resetting the Web console will log any other users off of the system. 4. Ping the IP address of the Web console to make sure it responds. If it does not respond, contact your network administrator. 5. Reset the Web console to its default configuration by pressing the Web Console Reset button while toggling the server's power switch to OFF then ON. Do not release the Web Console Reset button until selftest completes (the only front panel LED lit is the green POWER LED). Chapter 3
-
 1
1 -
2
-
3
-
4
-
5
-
6
-
7
-
8
-
9
-
10
-
11
-
12
-
13
-
14
-
15
-
16
-
17
-
18
-
19
-
20
-
21
-
22
-
23
-
24
-
25
-
26
-
27
-
28
-
29
-
30
-
31
-
32
-
33
-
34
-
35
-
36
-
37
-
38
-
39
-
40
-
41
-
42
-
43
-
44
-
45
-
46
-
47
-
48
-
49
-
50
-
51
-
52
-
53
-
54
-
55
-
56
-
57
-
58
-
59
-
60
-
61
-
62
-
63
-
64
-
65
-
66
-
67
-
68
-
69
-
70
-
71
-
72
-
 73
73 -
 74
74 -
 75
75 -
 76
76 -
 77
77 -
 78
78 -
 79
79 -
 80
80 -
 81
81 -
 82
82 -
 83
83 -
84
-
85
-
86
-
87
-
88
-
89
-
90
-
91
-
92
-
93
-
94
-
95
-
96
-
97
-
98
-
99
-
100
-
101
-
102
-
103
-
104
-
105
-
106
 |
 |
