HP t5565 HP ThinPro, version 3.2, Administrator's Guide - Page 10
The ThinPro Taskbar, Administrator/User Mode Switch, Switch to Admin Mode, The HP button, Window tasks - admin password
 |
View all HP t5565 manuals
Add to My Manuals
Save this manual to your list of manuals |
Page 10 highlights
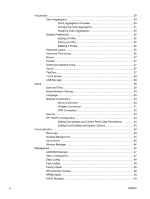
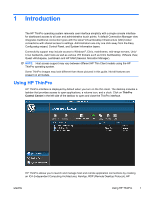
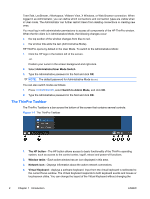
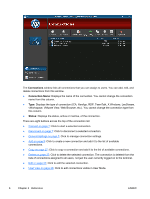
TeemTalk, LeoStream, vWorkspace, VMware View, X Windows, or Web Browser connection. When logged in as Administrator, you can define which connections and connection types are visible when in User mode. The Administrator can further restrict Users from deleting connections or creating new ones. You must log in with administrator permissions to access all components of the HP ThinPro window. When the thin client is in Administrative Mode, the following changes occur: ● the top section of the window changes from blue to red. ● the window title adds the text (Administrative Mode). HP ThinPro opens by default in the User Mode. To switch to the Administrative Mode: 1. Click the HP logo in the bottom left of the screen. -orPosition your cursor in the screen background and right-click. 2. Select Administrator/User Mode Switch. 3. Type the Administrative password in the field and click OK. NOTE: The default password for Administrative Mode is root. You can also switch modes as follows: 1. Press Ctrl+Alt+Shift+S, select Switch to Admin Mode, and click OK. 2. Type the Administrative password in the field and click OK. The ThinPro Taskbar The ThinPro Taskbar is a bar across the bottom of the screen that contains several controls: Figure 1-1 The ThinPro Taskbar 1. The HP button - The HP button allows access to basic functionality of the ThinPro operating system, such as access to the control center, logoff, reboot and power-off functions. 2. Window tasks - Each active window has an icon displayed in this area. 3. Network icon - Displays information about the active network connections. 4. Virtual Keyboard - displays a software keyboard. Input from the virtual keyboard is redirected to the current focus window. The Virtual Keyboard responds to both keyboard events and mouse or touchscreen clicks. You can change the layout of the Virtual Keyboard without changing the 2 Chapter 1 Introduction ENWW
-
 1
1 -
2
-
3
-
4
-
 5
5 -
 6
6 -
 7
7 -
 8
8 -
 9
9 -
 10
10 -
 11
11 -
 12
12 -
 13
13 -
 14
14 -
 15
15 -
16
-
17
-
18
-
19
-
20
-
21
-
22
-
23
-
24
-
25
-
26
-
27
-
28
-
29
-
30
-
31
-
32
-
33
-
34
-
35
-
36
-
37
-
38
-
39
-
40
-
41
-
42
-
43
-
44
-
45
-
46
-
47
-
48
-
49
-
50
-
51
-
52
-
53
-
54
-
55
-
56
-
57
-
58
-
59
-
60
-
61
-
62
-
63
-
64
-
65
-
66
-
67
-
68
-
69
 |
 |